Skip to content
This guide will explain how to use the Flat Rate reporting system within Workshop Software.
A Flat Rate is when a workshop charges for only a predefined number of Labour hours, regardless of a mechanic's recorded time to complete the work. Depending upon the workshop's policies and jurisdiction they may also pay their staff only for the Flat Rate hours.
Flat Rate Labour is most commonly used in mechanic shops that will only be paid "Book Rate" for warranty or insurance work, which defines the time an insurer will pay for Labour on each operation. It is also sometimes used for fixed price servicing or repairs, agreed upon and approved before the work is complete.
Workshop Software allows users to enable a Flat Rate field in Labour Products, this allows you to compare the Mechanic's Time logs to the Invoice Labour and calculate the efficiency percentage %EFF for each job, a measure of efficiency also sometimes used to ensure all employees have received at least the local minimum wage.
Enabling Flat Rate Labour Products
The Flat Rate Report and Fields will not be available until you enable Flat Rate in your Company Settings.
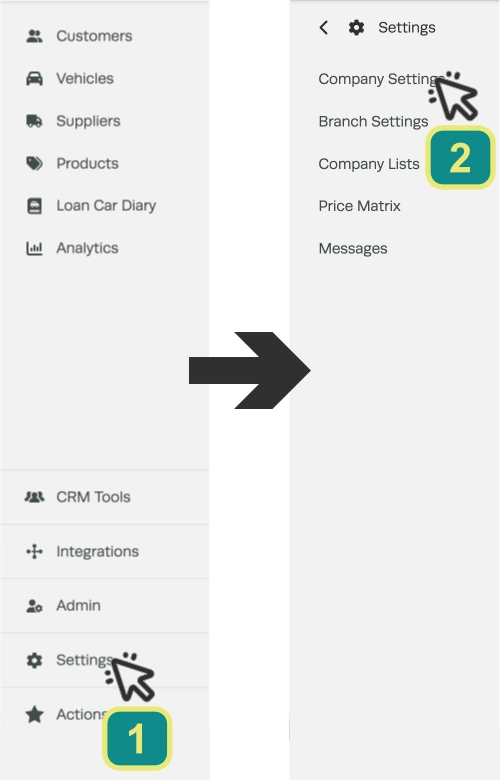
- In the left hand sidebar menu click Settings (1) then select Company Settings (2).
- In the Product Settings card toggle Flat Rate to "On".

- Scroll down and click Save after making this change.

Creating a Flat Rate Labour Product
Once Flat Rate is enabled all Labour products will now contain a Flat Rate field which may be set to record the Flat Rate in hours.
Invoices multiply the quantity of the Labour Product and associated Flat Rate. For example, if the Flat Rate amount for a Labour product is 3 and the quantity is 3 the Total Flat will be 9.
Warning: If a Labour Product is intended to represent 1 hour of work the Flat Rate MUST be set to "1".
Please note: Only Labour Products will contain a Flat Rate field as these are the record against which technicians will track their time.
Hourly Flat Rate Product
An Hourly Flat Rate product is used on Invoices to report the total hours of Flat Rate Labour charged to a client.
Please Note: The Hide Labour Qty toggle in Settings > Company Settings > Invoice Settings must be set to "No" to display this number on your Invoices.
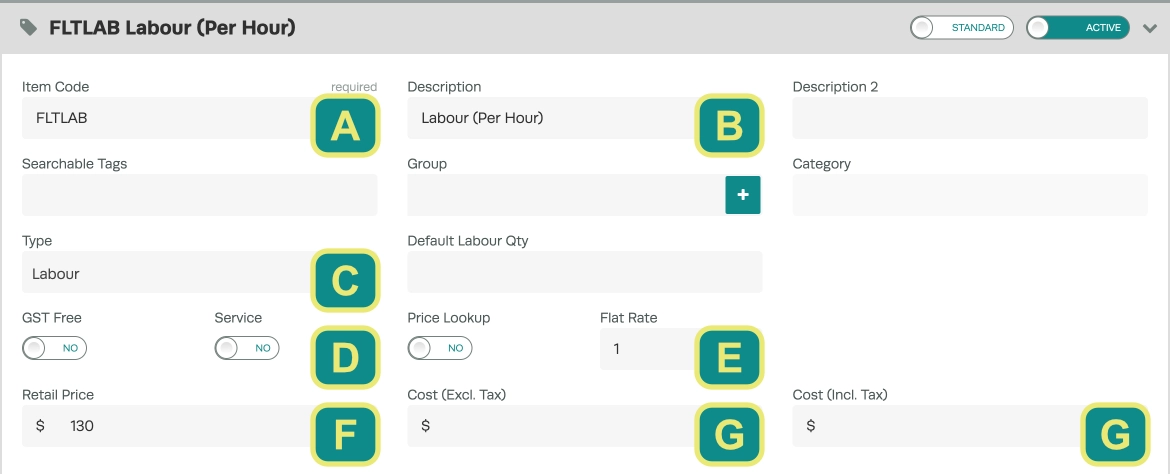
| Field | What it does |
|---|---|
| A. Item Code | If your Workshop completes Flat Rate Jobs and also Hourly Labour it is useful to choose an Item code that will distinguish Labour Types. |
| B. Description | As this Product is used to represent one hour of Labour a "per hour" unit in the Description is useful. |
| C. Type | This must be set to Labour, no other Product Type tracks time and Flat Rate. |
| D. Service | The Service toggle may be used as normal, when set to "Yes" the Last Service and Next Service field of Vehicles attached to an Invoice will be updated when the Invoice is Processed. |
| E. Flat Rate | For hourly products this MUST be set to 1. |
| F. Retail Price | Set to the retail price for 1 hour of Labour in your Workshop. |
| G. Cost | If you pay your staff on Flat Rate this should be set to an average of your teams hourly rate. If your staff are paid per hour worked this should be set to 0, Invoices will then calculate their Labour cost using the Cost Per Hour field of each Mechanics profile. |
Defined Flat Rate Product
A Defined Flat Rate Product is used when you do not want to display the Flat Rate hours to a client, only the total cost of each task.
These are most commonly used for single repetitive tasks like changing Brake Pads or for a specific Warranty Recall or Book Rate activity.
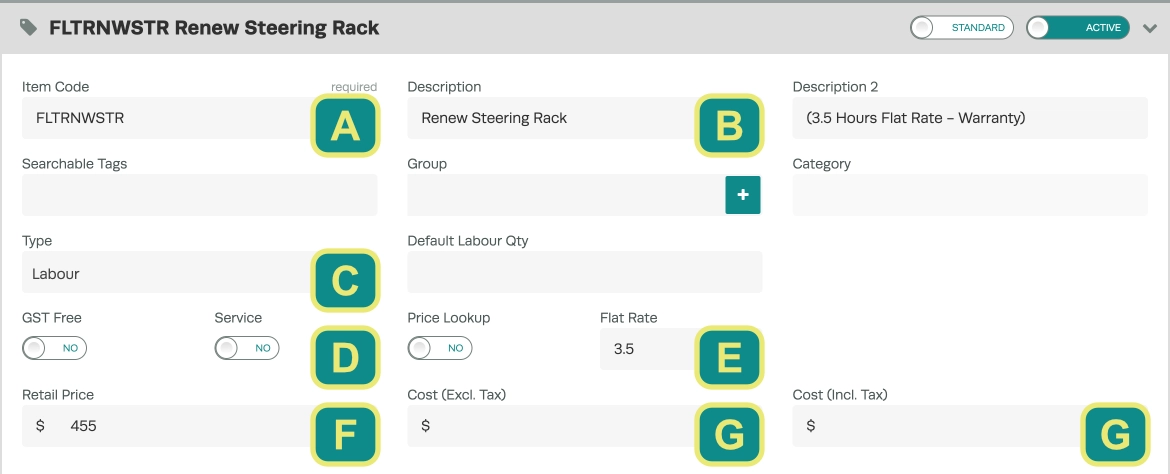
| Field | What it does |
|---|---|
| A. Item Code | If your Workshop completes Flat Rate Jobs and also Hourly Labour it is useful to choose an Item code that will distinguish Labour Types. |
| B. Description | Defined products represent one task and its associated Flat Rate and pricing, the description fields should contain enough information to identify this task. |
| C. Type | This must be set to Labour, no other Product Type tracks time and Flat Rate. |
| D. Service | The Service toggle may be used as normal, when set to "Yes" the Last Service and Next Service field of Vehicles attached to an Invoice will be updated when the Invoice is Processed. |
| E. Flat Rate | For a Defined product this should be the Book Rate of that operation. |
| F. Retail Price | For a Defined product this should be the retail price for 1 hour of Labour multiplied by the Flat Rate. |
| G. Cost | If you pay your staff on Flat Rate this should be set to an average of your teams hourly rate multiplied by the Flat Rate value. If your staff are paid per hour worked this should be set to 0, Invoices will then calculate their Labour cost using the Cost Per Hour field of each Mechanics profile. |
- Click Save in the bottom right hand corner of the Product Card after you have created or modified your Product.

Using Flat Rate Labour on Invoices
You can then create an Invoice for your Customer and the Flat Rate that you have added within the product will automatically display. For Defined Flat Rate Products you may edit the Flat Rate amount you have added to a product by clicking into the box.
Warning: Do not edit Flat Rate on Hourly Flat Rate Products, instead enter the total Flat Rate hours into the QTY box.
The mechanic can then clock on and off the job to trigger the profitability comparison within the Flat Rate Report, this article explains clocking on and off in Workshop Software.
Hourly Flat Rate Invoice
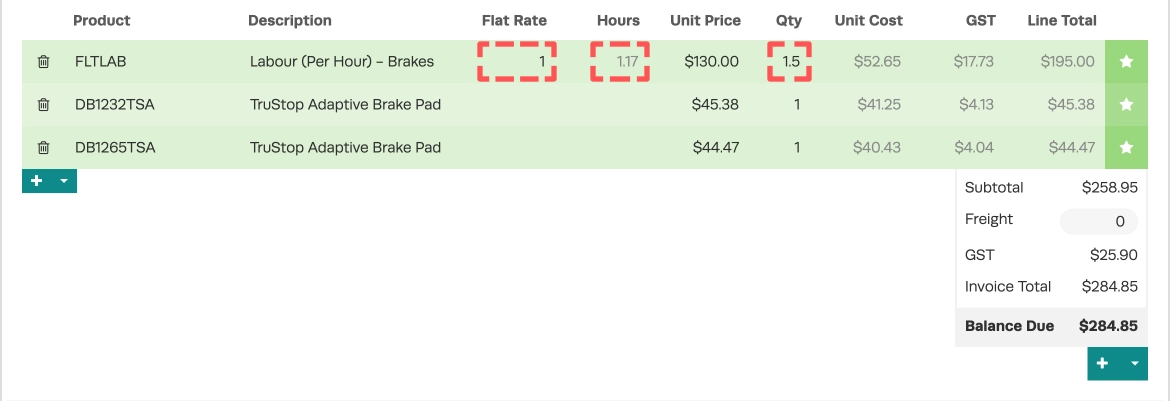
In this Invoice an Hourly Flat Rate product has been used, the Flat Rate remains at 1 hour and the Qty has been updated to 1.5 hours for a total Flat Rate of 1.5 hours.
The mechanic has clocked in for 1.17 hours, beating the Flat Rate time will leave this Mechanic with a greater than 100% EFF%.
Defined Flat Rate Invoice
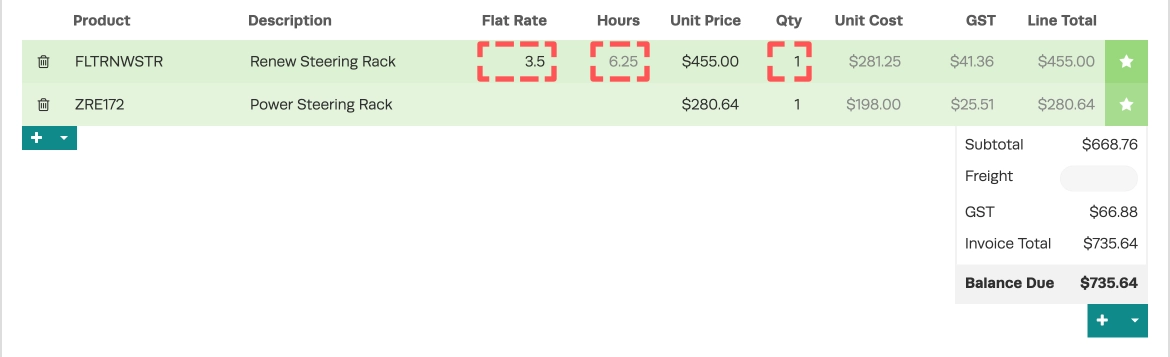
In this invoice a Defined Flat Rate product is used with a Flat Rate of 3.5 Hours, as the mechanic has recorded 6.25 Hours they will have a EFF% lower than 100%.
Running a Flat Rate Report
A Flat Rate Report summarises the total Flat Rate and hours worked for all Invoices a Mechanic has clocked time on during a defined period.
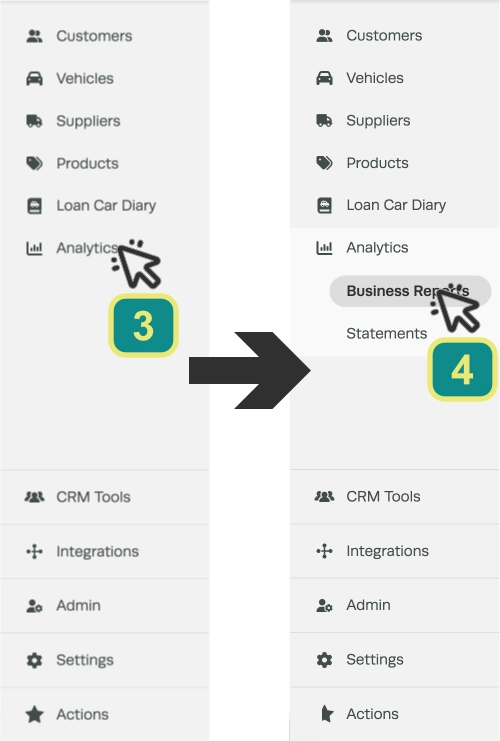
- To access Reports click Analytics (3) in the left hand side bar menu then Business Reports (4).
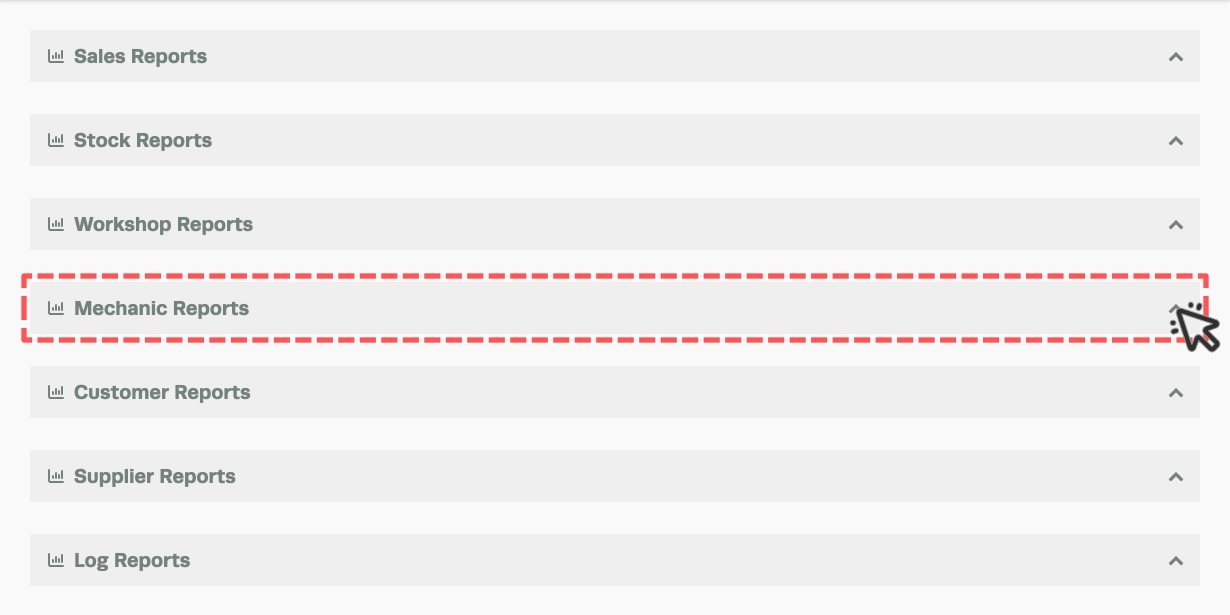
- Click the arrow to the right of the Mechanic Reports header and scroll down to the Mechanic Flat Rate report.
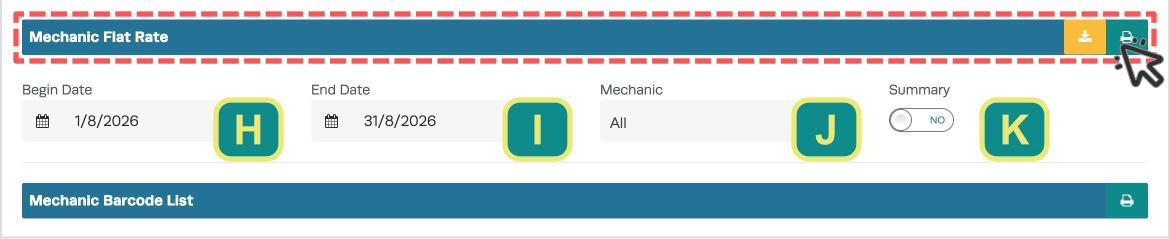
- Before generating the report you may choose a start and end date (H I), if to include all or only a single Mechanic (J) and if the report will Summarise (K) Invoice details.
- Click the green Printer icon to generate a report.
In this report you will see each of your Mechanics that have clocked onto a Job that also has a Flat Rate Labour product attached and details of their work.
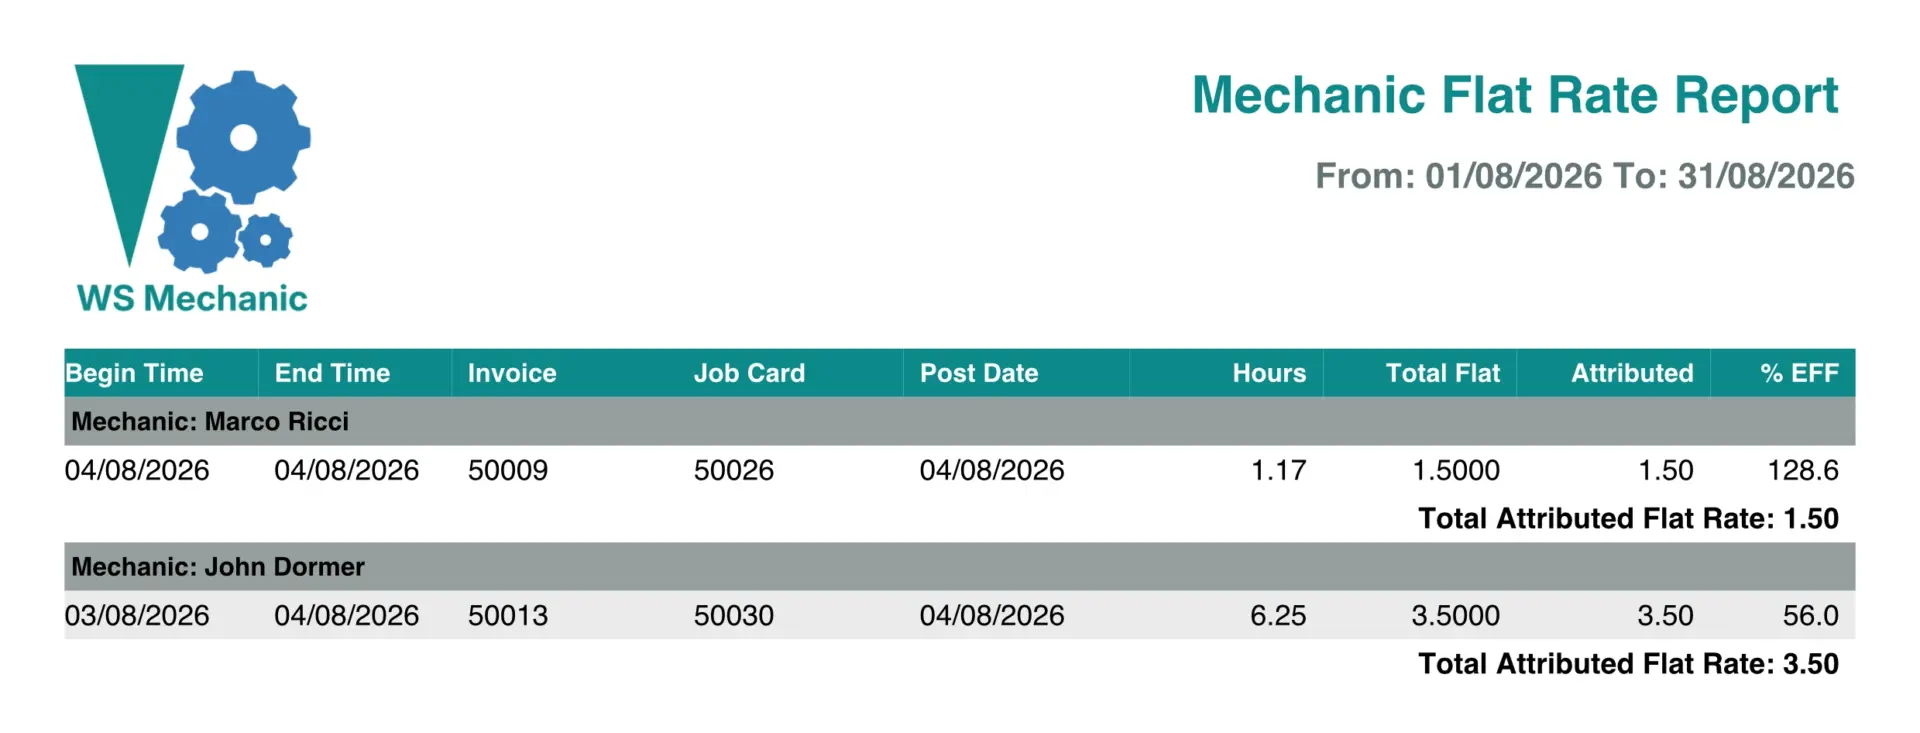
The report is designed to show what the Flat Rate attributed to each Mechanic is per Labor Product and their calculated efficiency based on the comparison.
For example, if a Mechanic clocked onto a job for 4 hours and the assigned Flat Rate for that Labor Product was 3 hours, their EFF% would be 75% as they took longer than the specified Flat Rate.
Explanation of Flat Rate Report Fields
| Field | What it does |
|---|---|
| Begin Time | The time the mechanic clocked onto this Job. |
| End Time | The time the mechanic clocked off this Job. |
| Invoice | The Invoice number of the job, only processed Invoices will display an Invoice number on the Flat Rate report. |
| Job Card | This is the Job number which the mechanic clocked onto. Note that only Jobs which contain both a Flat Rate Labour product and Mechanic time will display on the Flat Rate report. |
| Post Date | The date which an Invoice was Processed. |
| Hours | The number of Hours in the Clocked on Period. |
| Total Flat | The total Flat Rate of the labor product. |
| Attributed | The Flat Rate value attributed to each Mechanic. This is only relevant when more than one mechanic has clocked onto a labor product. If this is the case, the report will calculate how the Flat Rate should be split between each mechanic. |
| %EFF | The efficiency percentage based on the attributed Flat Rate and the hours that the Mechanic has clocked onto the labor line for. |
| Total Attributed Flat Rate | This value is the total number of Flat Rate hours accrued for work between the Report's Begin Date and End Date, this may be used to calculate each Mechanic's pay for this period. |
Related Articles
- Enter your tax type and rate
- Why has an invoice/payment not synced to your accounting system
- QuickBooks Online - You and System Administration were working on this at the same time