How to delete an additional user

SettingsUpdated 20 Sep 20262 min read
Workshop Software lets you delete an additional user through your Admin settings, the change takes effect immediately once confirmed and cannot be reversed. Follow the steps below to update this setting.
Please note: If you are wanting to delete a user because a staff member has left and you want to create a new login for the incoming staff member. DO NOT DELETE this user, instead EDIT the user. Here is a guide on how to edit your login details.
1. Click on 'Admin' from the menu options down the left hand side of the screen and then click on 'User';
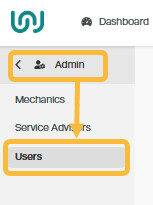
Workshop Software how to delete an additional user showing 'admin' from the menu options down the left hand side of the sc...
2. Find the user you wish to delete and click on the 'pencil' icon to the far right of their details;
Workshop Software how to delete an additional user showing user you wish to delete and click on the 'pencil' icon to the f...
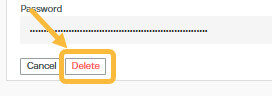
3. Click on the red 'Delete' button at the bottom left;
Workshop Software how to delete an additional user showing red 'delete' button at the bottom left
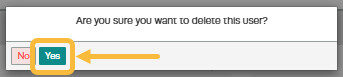
4. Then click on the 'Yes' button to confirm you want to delete this user;
Workshop Software screen showing then click on the 'yes' button to confirm you want to delete this user

Good to Know

  • Review your settings periodically to ensure they still match your workshop's current workflow.

Frequently Asked Questions

Can I change this setting back later?

No. Once a user has been deleted it may not be recovered.
Can I restrict what an employee can access in Workshop Software?

Yes. Workshop Software allows you to set permissions for each user, controlling which areas of the system they can view or edit. Check the user settings for available permission options.

Also Explore

Was this article helpful?