Skip to content
This guide will show you how to create a Mobile User who may use the Workshop Software Mobile App to clock in and out of jobs assigned to them & add photos to a Job's attachments.
A Gold Subscription clients' mechanics may also create or complete Inspections, add notes or parts to Jobs or Bookings and view or edit Customer details inside the Mobile App.
Please Note: Your "normal" Workshop Software account may also be used to log in to our Mobile App, please see this article for details on how to use this account.
Please Note: Any assigned Mechanic must already be set up in Workshop Software, please see the guide Adding a new mechanic to do this.
Creating a New Mobile User
You must create a Mobile User with a unique email to access the phone app, emails that are used to login to the PC App may not be reused here.
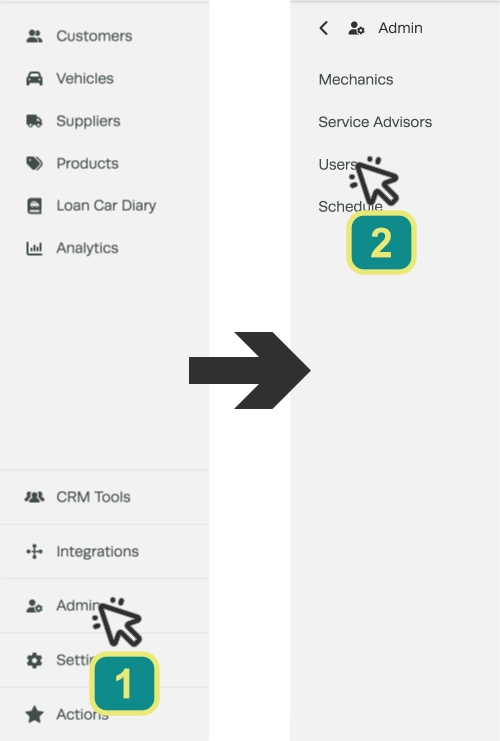
- Click Admin (1) in the left hand side bar menu of and then click Users (2).
- Click on the + icon at the far right of the Mobile Users card.

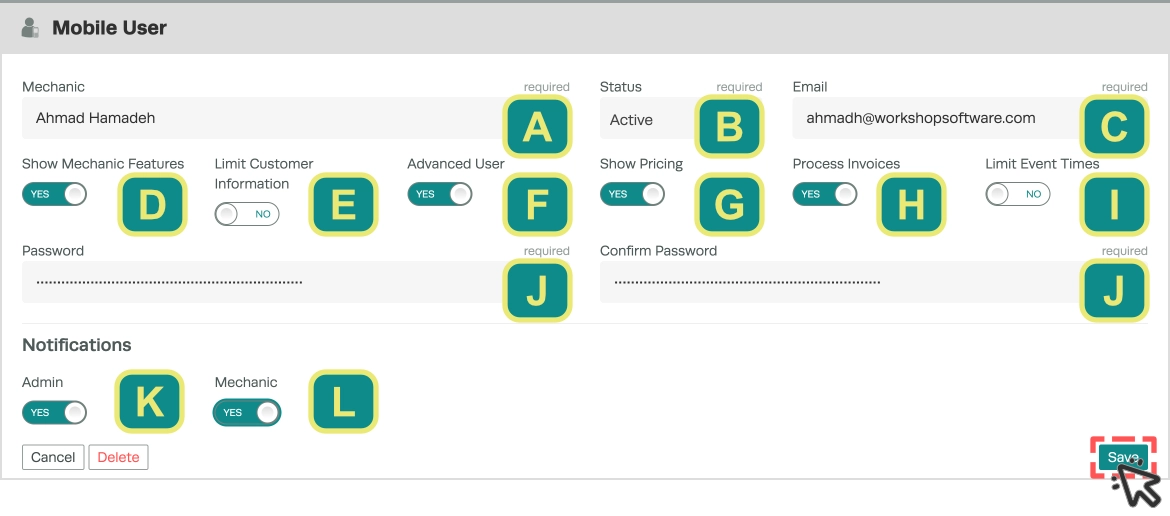
- If the Mobile User account is for a Mechanic set the Show Mechanic Features toggle (D) to Yes.
- Enter details for the Mobile User then click the Save button.
Mobile User Settings Explained
| Field | What it does |
|---|---|
| A. Mechanic | Select a Mechanic created under Admin > Mechanics to assign to this user account. |
| B. Status | An Active user may log in to and operate the Mobile App according to their Access limits, if Inactive or Blocked they cannot log in. |
| C. Email | This must be a unique Email Address that is not used as a Login In for a PC account, be careful when selecting an Email that you may wish to use elsewhere in Workshop Software. |
| D. Show Mechanic Features | When enabled the User's account is tied to a system Mechanic and will allow them to use the Clock On and Clock Off functions. |
| E. Limit Customer Information | When enabled the customer contact information on Bookings and Jobs will be limited to only essential details. |
| F. Advanced User | An advanced user may open a Booking or Job to use the full capacity of the Mobile App. If this toggle is disabled they may only use the App to Clock On or Off a Job Card and save pictures. |
| G. Show Pricing | When enabled the user will see the Retail Price for parts they search for or add to an Invoice or Booking. |
| H. Process Invoices | When Enabled the user may process Invoices and record Invoice Payments. |
| I. Limit Event Times | When enabled a Mechanic User will only be able to view Booking Events, they will not have the ability create them. |
| J. Password / Confirm Password | A password must be created for Mobile User accounts, it must be at least 8 characters long and contain a capital letter. |
| K. Admin Notifications | When enabled the user will receive notifications that a customer has requested a booked time online or when an online payment has been received. |
| L. Mechanic Notifications | When enabled the user will receive a notification that an event time has been assigned to them from a Booking and to Clock Out if still Clocked On to a Job at closing time. Please Note: The desired Mobile Notifications must also be enabled in the settings of this users' Mobile App. This article explains how to Enable and Choose their Notifications. |
Non-Mechanic Users
Service advisors and Admin team members may also use the Mobile App.
- When creating the new user ensure the Show Mechanic Features toggle (D) is set to No.
- You will need to complete First Name and Last Name fields in place of assigning a Mechanic and will no longer have access to the Limit Event Times toggle (I) as Non-Mechanic Users will never have assigned Booking Events.