You now have the ability to create a new invoice by clicking the plus at the top of the job screen. Through this process, you can also create customers and vehicles inside the app.#
Added functionality to process invoices and collect payments via the app, giving you full functionality of managing jobs and invoices from creation to competition, payment and emailing the invoice to your customer.#
You can also view closed invoices via the dropdown on the search bar at the top of the job screen.#
Includes web side security to manage who has access to certain features.#
A major update that provides you with even greater power in the palm of your hand.#
Once you have turned on these features, log in to the mobile app. You will notice a "+" icon at the top right-hand corner of the screen.
Press the "+" icon, which will take you to the customer's screen where you can select the customer for whom you are creating a new invoice.
Once you have selected the customer, you will be taken to the customer's vehicles. Select the vehicle you will be working on, then press Confirm.
After selecting the customer and vehicle, a Job Card will be created. You will then be taken to the Job Card overview tab, where you will be able to Start the job, Post Date, update the Job Status, edit vehicle details, customer details, and start the job.
Press on the box next to
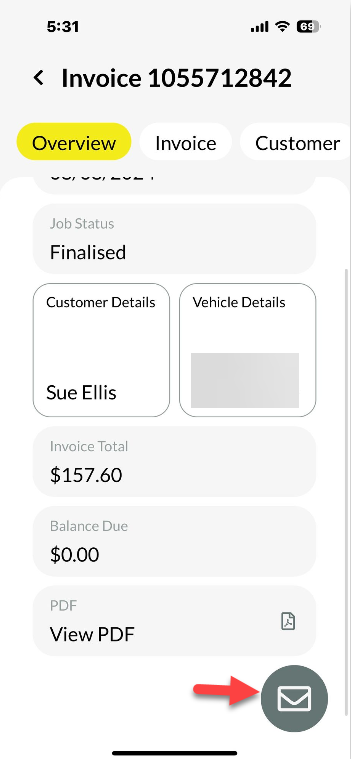
Once the invoice has been processed and paid, you can then email a copy of the paid invoice to your customer.
Press on the circle bottom right hand corner
Select Email
Confirm that the email address is correct. Press the magnifying glass if you would like to email the invoice to multiple recipients. Change the toggle to Yes to include the invoice. Press the box in the email content area if you want to change or add anything else to the email body, then press
window.
If the customer does not have a vehicle, press Skip.
Then enter the vehicle details:
Plate Number (compulsory field)
Make
Model
Body Type
State
Year
Colour
Odometer
Hours
VIN
Press Create once all necessary details are entered.
There is also a feature to view all open, processed, and closed invoices In the Mobile App#
To see all open, processed, and closed invoices in the mobile app, press the page icon next to the search bar.
Then select whether you would like to view open, processed, closed, or all invoices in the Job Centre.
You can also add a payment to a processed invoice directly from the Job Centre.
Select the processed invoice from the Job Centre to which you would like to apply a payment.
Press on the Balance Due Box
Press the "+" icon next to Payments.
Select the Payment Method and then press Confirm.
The payment will then be created. If the details are correct, press Process.
You will then see the payment listed in the Payments tab.
Press the arrow to return to the Job Centre.
Please note: This feature is available for Gold Subscription users.
 Skip to content

 Press the "+" icon, which will take you to the customer's screen where you can select the customer for whom you are creating a new invoice.
 Once you have selected the customer, you will be taken to the customer's vehicles. Select the vehicle you will be working on, then press Confirm.
 After selecting the customer and vehicle, a Job Card will be created. You will then be taken to the Job Card overview tab, where you will be able to Start the job, Post Date, update the Job Status, edit vehicle details, customer details, and start the job.
 Press on the box next to
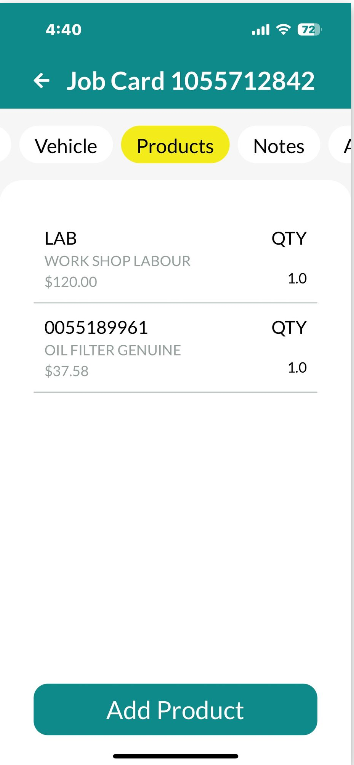 Please find the link to Adding Products, attachments and updating Labour time
https://workshopsoftware.com/knowledge-base/mobile-phone-app/enabling-new-features-in-the-mobile-app/
Once you have finished the Job and confirmed that the Job Card is correct press on the tick bottom right hand corner
Please find the link to Adding Products, attachments and updating Labour time
https://workshopsoftware.com/knowledge-base/mobile-phone-app/enabling-new-features-in-the-mobile-app/
Once you have finished the Job and confirmed that the Job Card is correct press on the tick bottom right hand corner
 Press Process
 Select whether to update the
  You will receive confirmation that the invoice has been processed.

 Select the payment method and press Confirm.
 If all information is correct Process the payment

 Select Email
 Confirm that the email address is correct. Press the magnifying glass if you would like to email the invoice to multiple recipients. Change the toggle to Yes to include the invoice. Press the box in the email content area if you want to change or add anything else to the email body, then press
  You will then receive a confirmation that the email was sent.

 Enter the following details:

 Then enter the vehicle details:

 Then select whether you would like to view open, processed, closed, or all invoices in the Job Centre.

 Press on the Balance Due Box
 Press the "+" icon next to Payments.
 Select the Payment Method and then press Confirm.
 The payment will then be created. If the details are correct, press Process.
 You will then see the payment listed in the Payments tab.
 Press the arrow to return to the Job Centre.
 Please note: This feature is available for Gold Subscription users.