 Skip to content
 There are three ways a mechanic may log their time in Workshop Software, by clocking on and clocking off inside the website, by using our Mobile App to clock on and clock off and by adding or modifying mechanic times in an invoice.
This article describes each process and how to configure a mechanic inside the system to enable quick clock on / clock off with their mechanic code or a barcode reader.
Clocking on and off inside Workshop Software
To access the mechanic clock on screen please click the clock icon (1) in the top right corner of Workshop Software.
To clock on or off an Invoice enter the Job Card number in the Job Card No. field (2), then search for (3) and choose (4) a mechanic in the Mechanic field. Clock on or off is complete as soon as the mechanic is chosen.

Hint: A barcode scanner may be used quickly to fill these entries by scanning a barcode on a printed Job Card and the Mechanic’s Barcode on Workshop Software’s Mechanic Barcode List business report.
Clocking on and off in the Mobile App
First access a Job / Invoice in the Mobile App’s Job Centre. You may find your Job in the list, search Open Jobs with the search field or click the Barcode Scanner icon to scan the printed Job Card’s barcode.

The user may then tap the Play button to clock on when the Time box is grey. To clock off tap the pause button when the Time box is green.

Adding or modifying Mechanic Time in an Invoice
The final method to add or modify clocked on time for a Mechanic is to adjust mechanic time against a Labour Product inside an Invoice.
In the product list of the invoice click the Star icon (5) next to the desired labour product and choose “Enter Mechanic Times” (6).

Inside the Mechanic Times page select the appropriate Mechanic (7) then click the clock icon for Begin Time (8) and End Time (9) to enter or modify the beginning and end of the clocked on period. Click the Save button (10) to store this record.

If you need to log multiple periods the + icon to the lower left of the Labour Items list will add a second period to modify and save.
Setting Up Mechanic Codes
Before using the clock on/off feature, you must ensure each mechanic has a Mechanic Code assigned.
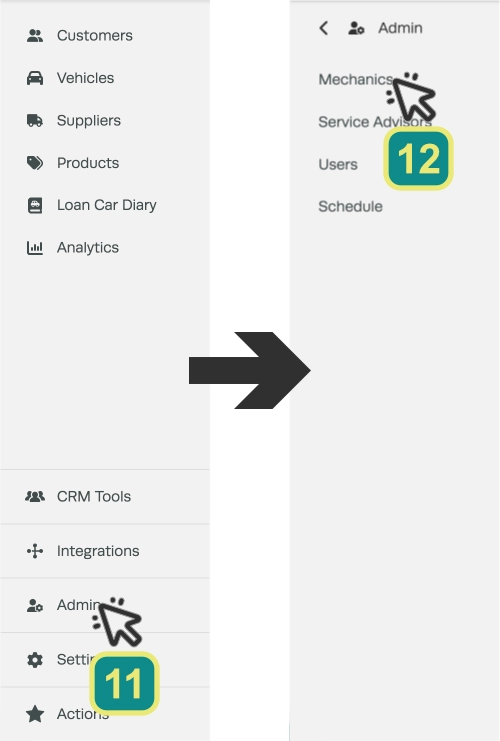
Begin by accessing the Mechanics setup in Admin, click Admin (11) and then Mechanics (12) in the left hand sidebar.
Choose the mechanic you would like to modify from the list by double clicking the entry or clicking the pen icon.

Add an identifying code to the Mechanic Code field in the Mechanic’s details, this code may be used to search for the mechanic throughout the system and is available as a Barcode in the Mechanic Barcode List Report.

Generating Mechanic Barcodes
Mechanic codes can be turned into barcodes to allow mechanics to clock on or off easily using a barcode scanner.
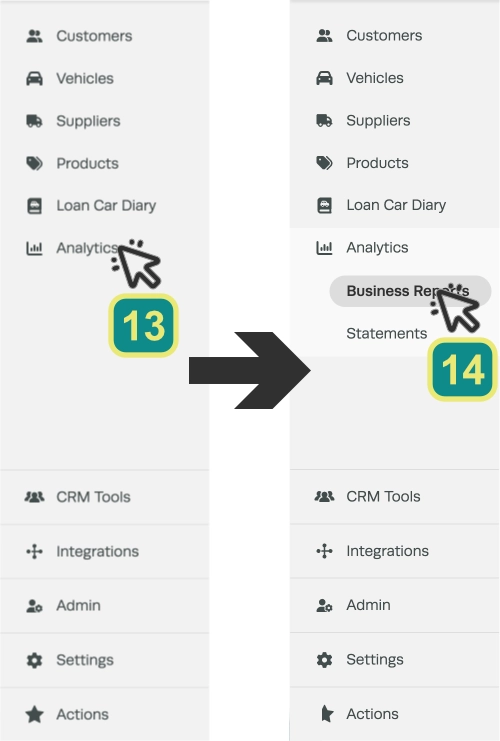
Access your Business Reports by clicking Analytics (13) and then Business Reports (14) in the left hand sidebar.
Scroll down to the Mechanic Reports banner and click the arrow (15) on the right hand side, then click the Printer icon next to the Mechanic Barcode List (16).

You may print or save the generated barcode document, these barcodes may be used with a barcode scanner to clock on inside Workshop Software or using the Barcode Scan icon in our Mobile App.

Good to Know
-
This feature is only available on the Workshop Software mobile app if you have created a mobile user for the mechanic with suitable access rights.
Frequently Asked Questions
Can I restrict what an employee can access in Workshop Software?
Yes. Workshop Software allows you to set permissions for each user, controlling which areas of the system they can view or edit. Check the user settings for available permission options.
Do I need a specific subscription level for this feature?
Some features in Workshop Software are available on specific subscription plans. If you do not see the option described in the steps above, check your current plan or contact the Workshop Software team to find out if an upgrade is required.
