 Skip to content
 Each of the settings within the Company Settings page configure the standard operations of Workshop Software and how information is displayed. This article provides a summary of the Company, Product, Vehicle, Booking, Tax, Invoice, System Numbers and Field Name customisation settings.
If you are a new user you should review each setting and choose the value that best matches your business processes and Invoicing preferences.
Explanation of Company Settings
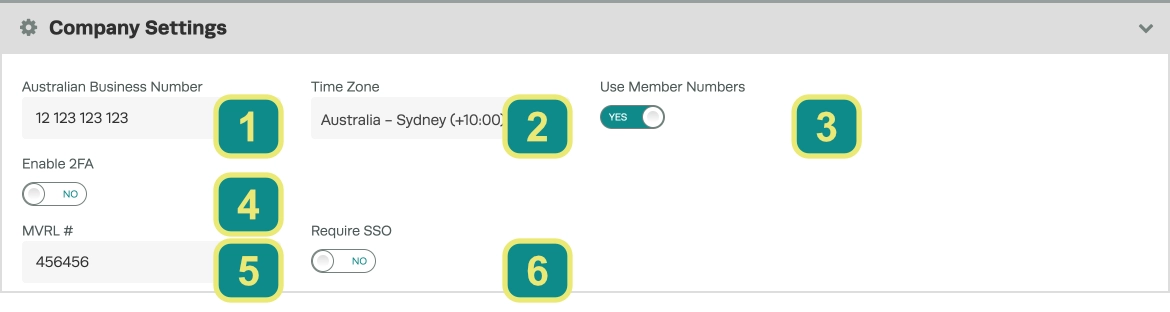
Australian Business Number / GST / VAT (1): An Australian Business Number (ABN) is a unique 11 digit number that identifies your business to the government and community. NOTE: This may have a different value depending on your location, e.g. VAT in the UK, GST in NZ.
Time Zone (2): Select which time zone you are located in (this will affect the time in your booking diary).
Use Member Numbers (3): The Member Number toggle enables a unique customer identifier you may use for an internal customer membership program or to store an identifier from an outside service like a buyers club, insurance provider or government body. The name of the number may be changed in the Variable Labels card on this page.
Enable 2FA (4): This toggle enables two factor authentication and provides additional options to Enforce 2FA and determine how often a user will be required to authenticate. When an Accounting Integration is connected this will be enabled and locked to Enforce 2FA to improve security for a linked system.
MVRL / MRB # (5): This may have a different name depending on your location, it is typically a state registration number for Mechanical Service businesses and will display on Customer Invoices.
Require SSO (6): This setting enforces the use of Azure Single Sign On and will display a field to record your Azure Tenant ID.
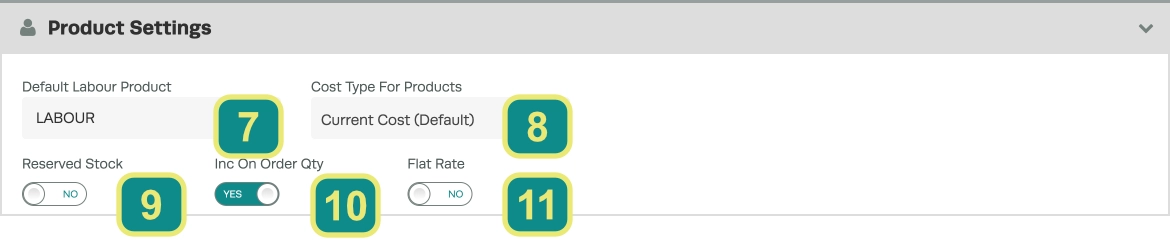
Default Labour Product (7): The Labour Product that will appear by default on bookings and jobs. For example, when performing an online booking. If this is not set the Booking Diary will be disabled.
Cost Type for Products (8): The accounting cost of a product is used to document the business profitability during invoicing and reporting, this setting chooses between two defined calculations. Current Cost reflects the latest Supplier Invoice price, Average Cost a blended valuation to minimise the impact of price volatility.
Reserved Stock (9): Use to turn on the Reserved Stock system, enabling a Reserved and Available Qty for each product which updates when Products are assigned to a Job. Enabling Reserved Stock also enforces the use of a Stocktake to change Stock quantities of Products.
Inc On Order Qty (10): Effects the behaviour of the Automatic Stock Order function, this articles explains this function and how Inc On Order Qty influences its calculations.
Flat Rate (11): When enabled a Flat Rate quantity field will be added to Labour Products. Flat Rate reporting is used either when a mechanic is paid for a defined Labour Period regardless of the real Mechanic Labour time logged or to compare a targeted completion time to the real Mechanic Labour time.
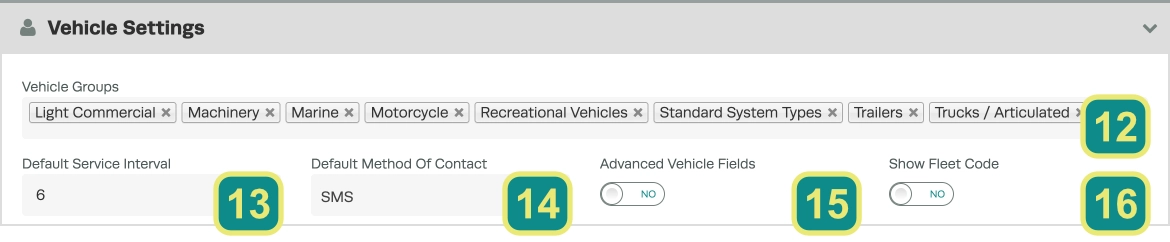
Vehicle Groups (12): Choosing Vehicle Groups will include relevant options in the Body Type drop down menu for a Vehicle. Some Body Types will also change the other fields available in a Vehicle’s record when Advanced Vehicle Fields is enabled. Common light vehicles such as 4WDs, Sedans and Coupes are defined in the “Standard System Types” option.
Default Service Interval (13): This value is how many months forward the Next Service field of a Vehicle will update when a Service Labour product is included in a Processed Customer Invoice.
Default Method Of Contact (14): This setting defines the default value of a new Customer’s Preferred Method of Contact, which is used for Automatic Reminder functions. If SMS is selected SMS credits will be required for each message, this article explains how to purchase SMS credits.
Advanced Vehicle Fields (15): When enabled this will change the available fields in a Vehicles Record depending upon its Body Type, when editing a Vehicle’s record the user must select the Vehicle Group that contains the desired Body Types. This is for clients from a different industry to auto mechanic shops that would record different details such as marine or bicycle workshops.
Show Fleet Code (16): When enabled this will show the value of a Vehicle’s Fleet Code field on Customer Invoices, Job Cards and in the Transaction Centre. The displayed name of the Fleet Code field may be changed in the Variable Labels card on this page.

Shop Opens / Closes (17 18): The earliest available Booking Time and Shop Closing time as used in the Booking Diary is defined here.
Show all Shop For Month (19): When enabled the Month view in the booking diary will display a single bubble indicator that will fill depending upon total available diary time. If disabled an indicator for each Mechanic’s time is displayed.
Description to Job Status Comment (20): If enabled a Booking’s Description Field will be copied into the Job Status Comment field of the Invoice created when a Job is started for a Booking.
Mechanics for Booking Diary (21): The number of mechanics you want to show on a single page of the booking diary’s single day view.
Default Work Hours Per Day (22): This is the combined work hours of all employees that will reflect on the Booking Diary’s available hours per day. To calculate this multiply your number of Mechanics by how many hours each work per day.
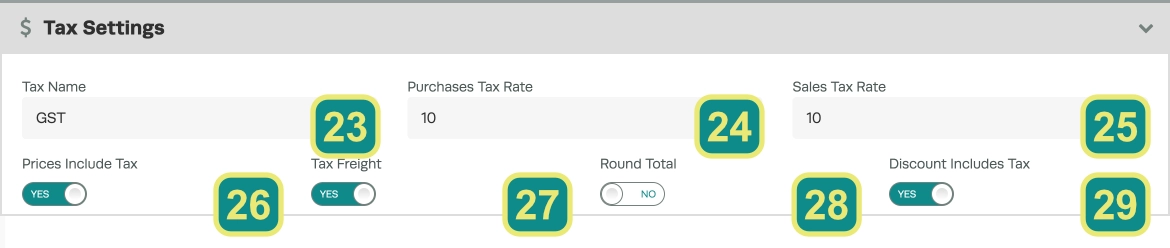
Tax Name (23): This field defines what name Tax values will have in Workshop Software Invoices. For Australia and New Zealand this is predefined as GST, the UK it will be VAT.
Purchase / Sales Tax Rate (24 25): The Percentage tax rates applied to Purchased parts and Sales to Customers in your region.
Prices include Tax (26): Important This toggle defines how the Retail Price of your Product is configured. When set to Yes the Retail Price field in Products should contain your pricing Including tax and Invoices will display unit costs inclusive of tax. If set to No the Retail Price field and Invoices will require pricing exclusive of tax.
Tax Freight (27): When set to Yes any value in an Invoice’s Freight field must be entered inclusive of GST, when set to No the invoice’s final total will add the Tax calculated for this Freight
Please Note: This field only effects the Tax calculation when the Prices Include Tax field is set to No, if Tax is include in retail pricing your Freight cost will always be invoiced inclusive of GST.
Round Total (28): This will round the total of an Invoice to the nearest 5 cents.
Discount Includes Tax (29): If this is set to No, any Discount applied to an Invoice will be subtracted from the Subtotal (before Tax Price) of an Invoice. If Yes the Discount will be subtracted from the Invoice Total.
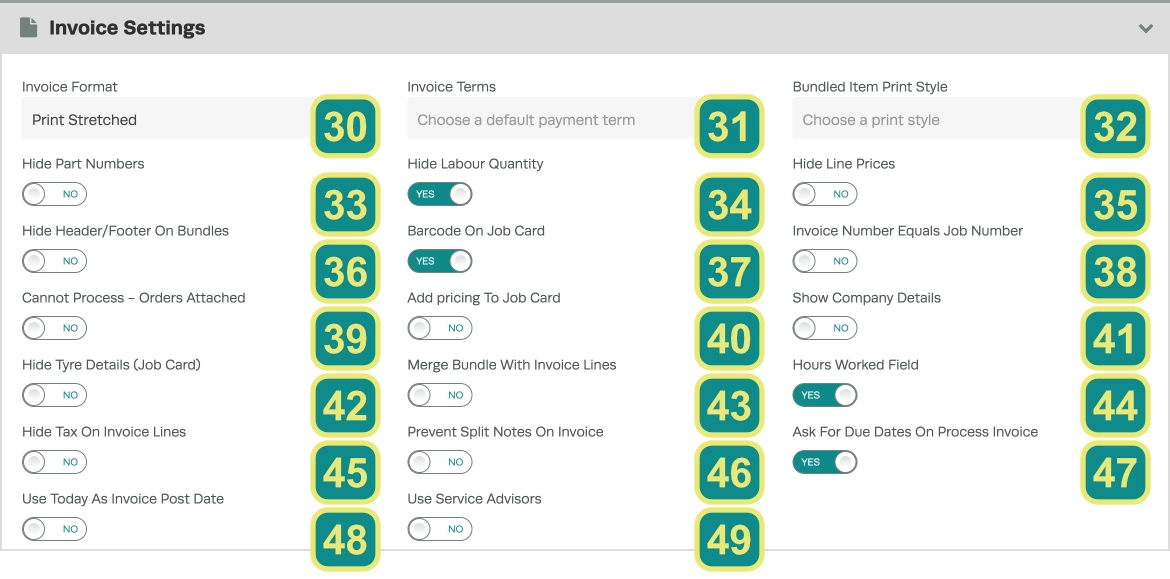
Invoice Format (30): Used to select from available invoice templates, this articles provides an example of each template.
Invoice Terms (31): This setting defines the default Payment Terms for an Account Invoice where a Customer does not have an option selected in their Payment Terms field.
Bundled Item Print Style (32): This relates to how product bundles (a bundle or kit of multiple parts added to an Invoice together) will display on the invoice. They may either be displayed as only the Bundle Name and Price or as an Itemised list of contents with or without individual item pricing.
Hide Part Numbers (33): This will hide Item Codes on all invoices, it is important to complete the Description field in each product if this is enabled, otherwise Invoices will display Products with no Description as a blank entry next to their price.
Hide Labour Quantity (34): This will hide the QTY value of Labour Products on all Invoices, displaying only the total Labour cost per Product.
Hide Line Prices (35): This will hide all retail line prices on Invoices, only the total cost of the Invoice is displayed.
Hide Header / Footer On Bundles (36): This will hide the bundle names as well as the bundle totals, only line items will be shown in an Invoice.
Barcode on Job Card (37): Turning this on will display a barcode on Job Cards that connects to the Workshop Software app. When scanned it will open the job and allow the mechanic to clock on and off the job.
Invoice Number Equals Job Number (38): When on instead of Job Numbers and Invoice Numbers being unique, the Job card and Invoice Number will be the same.
Cannot Process – Orders Attached (39): When enabled if Job is linked to a Stock Order, if the Stock Order is still open (the Parts have not been received by Processing a Supplier Invoice) the system will not allow the invoice to be processed.
Add Pricing To Job Card (40): This will display the Line Item prices inside the Job Card document.
Show Company Details (41): This option only appears when the “Print Stretched” Invoice template is selected. As this Invoice template prints the company logo the width of the paper it is sometimes used to include a graphic header with Company Details, turning this on will display company details when the logo does not have this contact information included.
Hide Tyre Details (Job Card) (42): The default Job Card includes a box to record tyre details, however if this is not needed the box may be removed with this setting.
Merge Bundle With Invoice Lines (43): This setting will cause bundle contents to display as normal line items.
Hours Worked Field (44): This setting defines if the hours worked by your mechanics display as a column on the Invoice / Job screen, it does not include this information on printed or sent invoice documents.
Hide Tax On Invoice Lines (45): Removes the Line Item GST column from the printed or sent Invoice. Only Unit Price and line Total will be displayed, the total GST for the Invoice will be displayed below the line items.
Prevent Split Notes on Invoice (46): If this is set to Yes the Invoice notes will not be split over 2 pages. Instead, all Invoice notes will appear together.
Ask for Due Dates on Process Invoice(47): When set to Yes, this will produce a pop-up when processing an Invoice associated with a Vehicle. This pop-up will prompt to update the rego due date, odometer and operating hours of the associated vehicle.
Use Today as Invoice Post Date (48): If set to Yes this will automatically update the post date of Invoice when they are processed to the Today’s Date. If set to No the user will receive a prompt when processing to choose between the value of the Date field or Today’s Date.
Use Service Advisors (49): This should be Enabled if your business uses Service Advisors to support your Customers. A Service Advisor list is added to the Admin menu and a Service Advisor may be assigned to a Job and will be displayed in the printed Invoice.
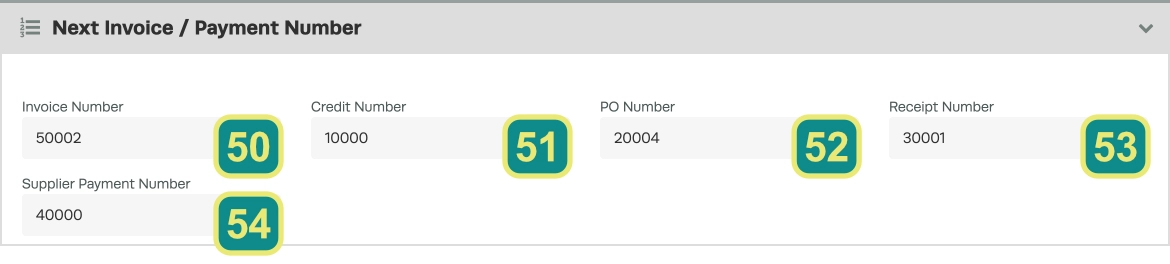
Invoice Number (50): The current lowest available Invoice / Job number, you may change this to a higher value if your accounting package or other integration would conflict with this value.
Credit Number (51): The current lowest available Credit number, you may change this to a higher value if your accounting package or other integration would conflict with this value.
PO Number (52): The current lowest available Purchase Order number that will be assigned to Stock Orders, you may change this to a higher value if your accounting package or other integration would conflict with this value.
Receipt Number (53): The current lowest available Receipt number, you may change this to a higher value if your accounting package or other integration would conflict with this value.
Supplier Payment Number (54): The current lowest available Supplier Payment number, you may change this to a higher value if your accounting package or other integration would conflict with this value.
Please note: If you want any of these value to be a lower number than displayed you will need to contact our support team.
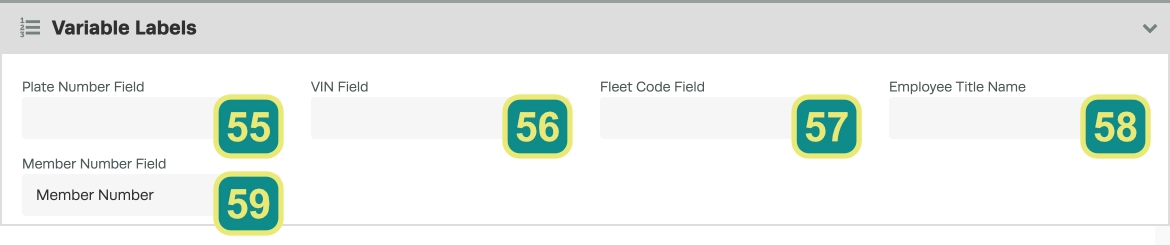
Plate Number Field (55): Where you can change the field name for ‘Plate Number’. This field appears when you access a vehicle. For example you may want to call it ‘Rego’ or ‘Number Plate’.
VIN Number Field (56): Where you can change the field name for ‘VIN Number’, this field appears when you access a vehicle.
Fleet Code Field (57): Where you can change the field name for ‘Fleet Code’, this field appears when you access a vehicle.
Employee Title Name (58): This changes the Employee title, e.g. Mechanic > Technician or Auto Electrician.
Member Number Field (59): This entry only appears when the Member Number toggle is enabled. You may change the field name to suit other purposes.

Code (60 61): The settings in the Dealer Access card are used only by franchise customers. If you believe this is you and are unsure how to use this function please contact support.
