This article explains how to set up a Markup (Cost Tier) price matrix, which marks a Customer's Products up based on what each Product costs you. For example, add 150% to parts costing $0.01 to $10.00 and 50% to parts costing $10.01 to $30.00. It does not use Product Groups.
The markup applies to any Product that is not Labour and has a cost inside one of the ranges you define in the Matrix.
Please note: Price Matrices are available on Gold and Platinum subscriptions.
Create a Markup (Cost Tier) Matrix
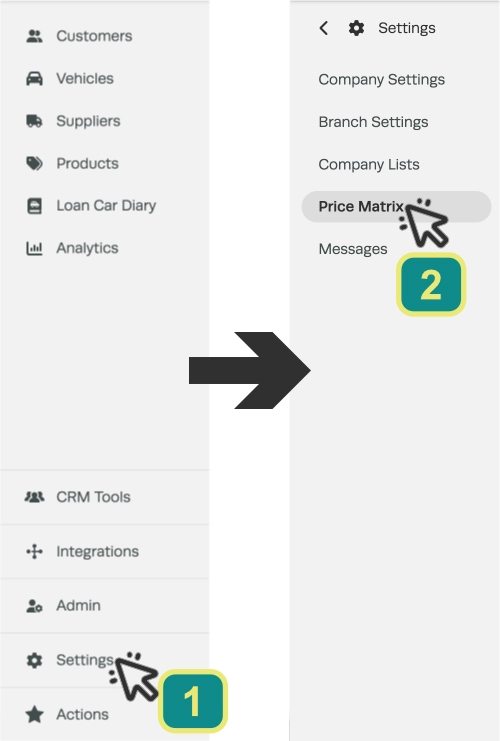
- Click Settings (1) in the left side menu, then Price Matrix (2).
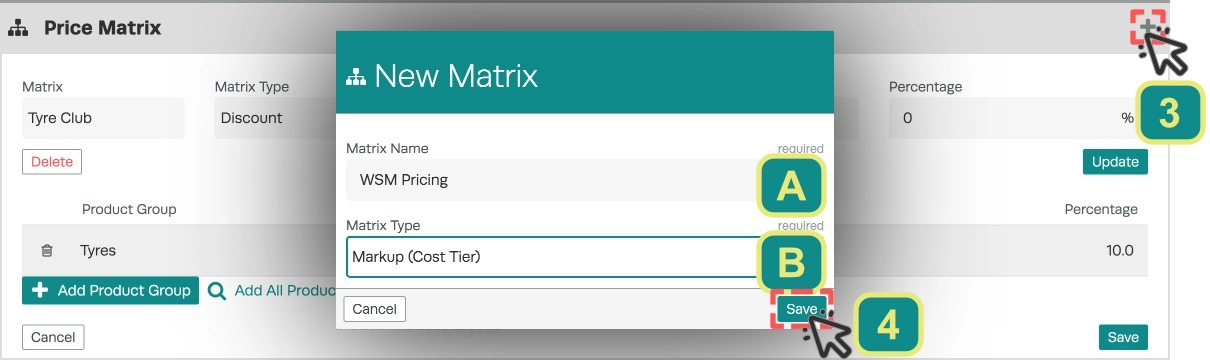
- Click the + icon (3) at the top right of the Price Matrix card.
- In the New Matrix pop up, type a Matrix Name (A), choose Markup (Cost Tier) from the Matrix Type list (B), then click Save (4).
Adding Cost Ranges
- Click Add Markup Range (5) once for each range you need. A new empty row appears each time.
- On each row, fill in the Description (C), Unit Cost Start (D), Unit Cost End (E) and Percentage (E). For example: Small parts, 0.01, 10.00, 150.
- Click Save (6) at the bottom righthand corner of the Price Matrix card.
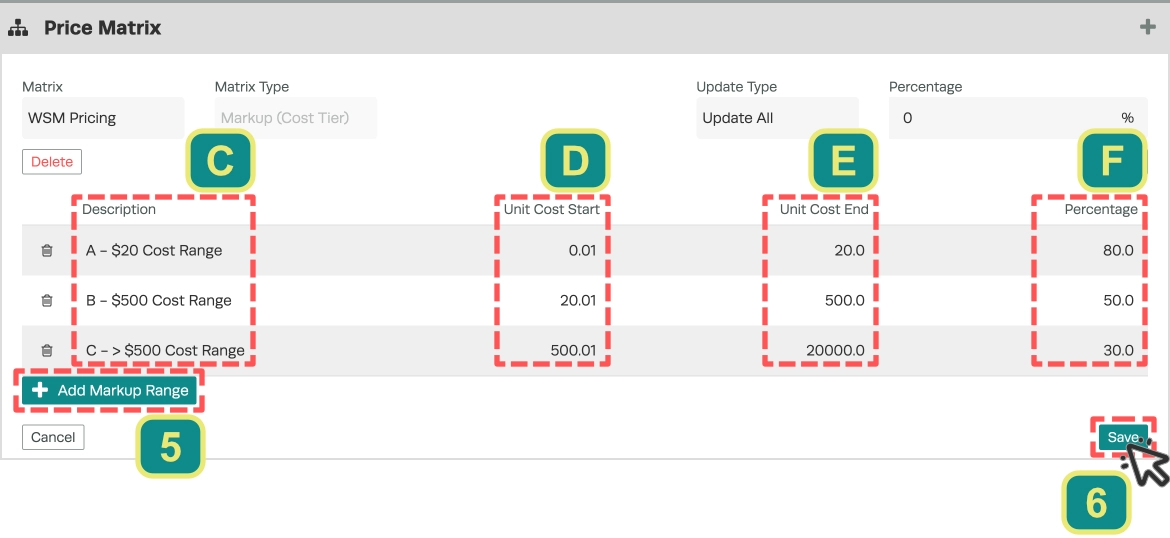
Products where the cost is not included in a Range or in a Range with a Percentage of 0% retain their normal Retail Price.
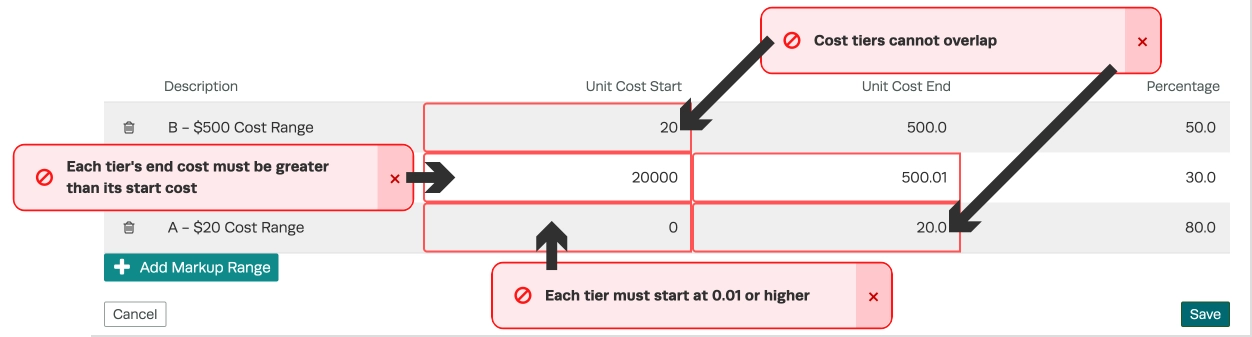
Please note: If a row is empty or two ranges clash you will be unable to save, the fields to fix are outlined in red and a message names the problem: "Each tier must start at 0.01 or higher", "Each tier's end cost must be greater than its start cost" or "Cost tiers cannot overlap".
Assigning the Matrix to a Customer
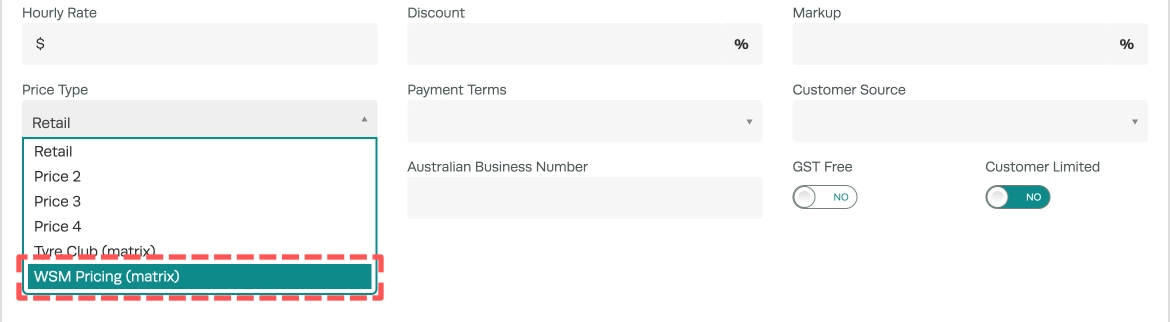
- Open the Customer and choose your matrix from the Price Type list.
- It shows as the matrix name followed by "(matrix)", for example Trade Tiers (matrix).
- Click Save In the bottom right hand corner of the Customer Details card.
How the New Price is Calculated
When you add a Product to an Invoice, Quote or Booking for an assigned Customer, Workshop Software finds the range the Product's cost falls into and adds that range's percentage to the cost.
A part that costs $100.00 in a 50% range comes in at a Unit Price of $150.00.
![A illustration of the formula Matrix Retail Price = Cost + (Cost x Percentage [Selected by Cost Range]) and an example calculation.](/?seraph_accel_gi=wp-content%2Fuploads%2FCT-Markup-Tier-Formula.webp&n=HikN4GK8ow4Jh0rgkdubg)
- Both ends of a range count, a cost of exactly $10.00 falls in a 0.01 to 10.00 range.
- A Product whose cost is outside every range, or in a gap between two ranges, keeps its normal Retail Price.
- Labour Products are never marked up, if your Customer is assigned an Hourly Rate, Labour Products use that rate as usual.
- If your prices include tax, the cost used is Cost (Incl. Tax), otherwise it is Cost (Excl. Tax).
- Because the price comes from cost, it can be lower than the Product's normal Retail Price.
Good to Know
- A Markup (Cost Tier) matrix cannot be changed into a Markup or Discount matrix and an existing Markup or Discount matrix cannot be changed into a Markup (Cost Tier) one, you must create a new matrix instead.
- Click Save before you remove a row with the bin icon, so the rows you have typed are kept.
- To mark up a single line on one Job instead, use Custom Markup from the star icon on that line.
- Platinum head offices can share the matrix with Send To Other Branches. Each branch receives the same ranges and percentages.
Frequently Asked Questions
Why wasn't a Product marked up?
Check that the Customer's Price Type is set to the matrix, that the Product's cost falls inside one of your ranges and that the range's Percentage is not 0. Labour and Products with no cost entered are never marked up.
Why is the marked up price lower than the normal Retail Price?
The price is worked out from cost, not from the Retail Price, so a Product with a large margin can come in below its Retail Price. Raise that range's Percentage if that is not what you want.
Does the Customer's Discount % or Markup % still apply?
Not to Products priced by the matrix. Products outside every range use the Customer's Discount % or Markup % as normal.
How are bundles priced?
Each part inside a bundle is marked up using the cost on its own bundle line. Labour inside a bundle is not marked up and a part line with no cost keeps its normal price.
Why can't I delete the matrix?
Remove every range first with the bin icon at the start of each row, then change the Price Type on every Customer using it. You can then click Delete. Until then you will see "This matrix has items associated to it and cannot be deleted" or "This matrix is associated with a customer and cannot be deleted".
Can a range start at $0.00?
No. Every range starts at 0.01 or higher.
Does changing a range reprice Jobs I have already started?
No. Lines already on a Job or Invoice keep the price they were added at. Only Products added to an Invoice after you save a change use the new ranges.