Skip to content
Integrating Xero with Workshop Software connects the two systems so that Invoices, Payments, Supplier and Customer data flow automatically from Workshop Software into Xero. This guide explains how the integration works, walks you through the initial setup process and provides a reference for account mapping.
Important: Invoices and payments will not sync to Xero until they have been PROCESSED.
Please review the Xero Integration Fact Sheet before connecting Xero and Workshop Software, it will explain in detail how data flows between each software package and highlight key prerequisites for a clean, successful integration.
Please Note: All new Workshop Software subscriptions include support from our team when connecting Xero or another Accounting Package integration.
We Strongly encourage speaking with Workshop Software's Support team before completing any Accounting Integration.

If you wish to change integration from one Accounting Package or Xero Organisation to another please contact support@workshopsoftware.com to discuss your requirements before taking any action.
Making the change without our support will produce errors, duplicated data and failed transaction synchronisation.
Xero Integration Fact Sheet
When you connect Xero to Workshop Software:
- Your Contacts from Xero are brought into Workshop Software.
- Your past transactions (and the Contacts linked to them) are sent from Workshop Software to Xero.
- From then on, any new transactions (and their linked Contacts) are automatically kept in sync between the two systems.
Please Note: By default a Workshop Software instance will sync ALL historical transaction data to Xero, the best time to connect Xero is during your Onboarding period with Workshop Software's support.
If you wish to restrict the export to data AFTER a chosen date (e.g. the end of the current financial year), change your connected Xero Organisation or change to or from an alternative Accounting Integration please contact support@workshopsoftware.com to discuss a service package for Accounting Changes.
Contact Sync
Connecting Workshop Software to Xero will import all contacts from Xero to Workshop Software and send Contact Information connected to any processed Transaction from Workshop Software to Xero.
Warning: When Xero is first integrated any contact that exists in both Xero and Workshop Software will create a Duplicate. We suggest only connecting between Xero and Workshop Software when one software package has no contact information.
If you have any Contact information in Both Xero and Workshop software please discuss your Integration with Workshop Software's support before connecting your accounts.
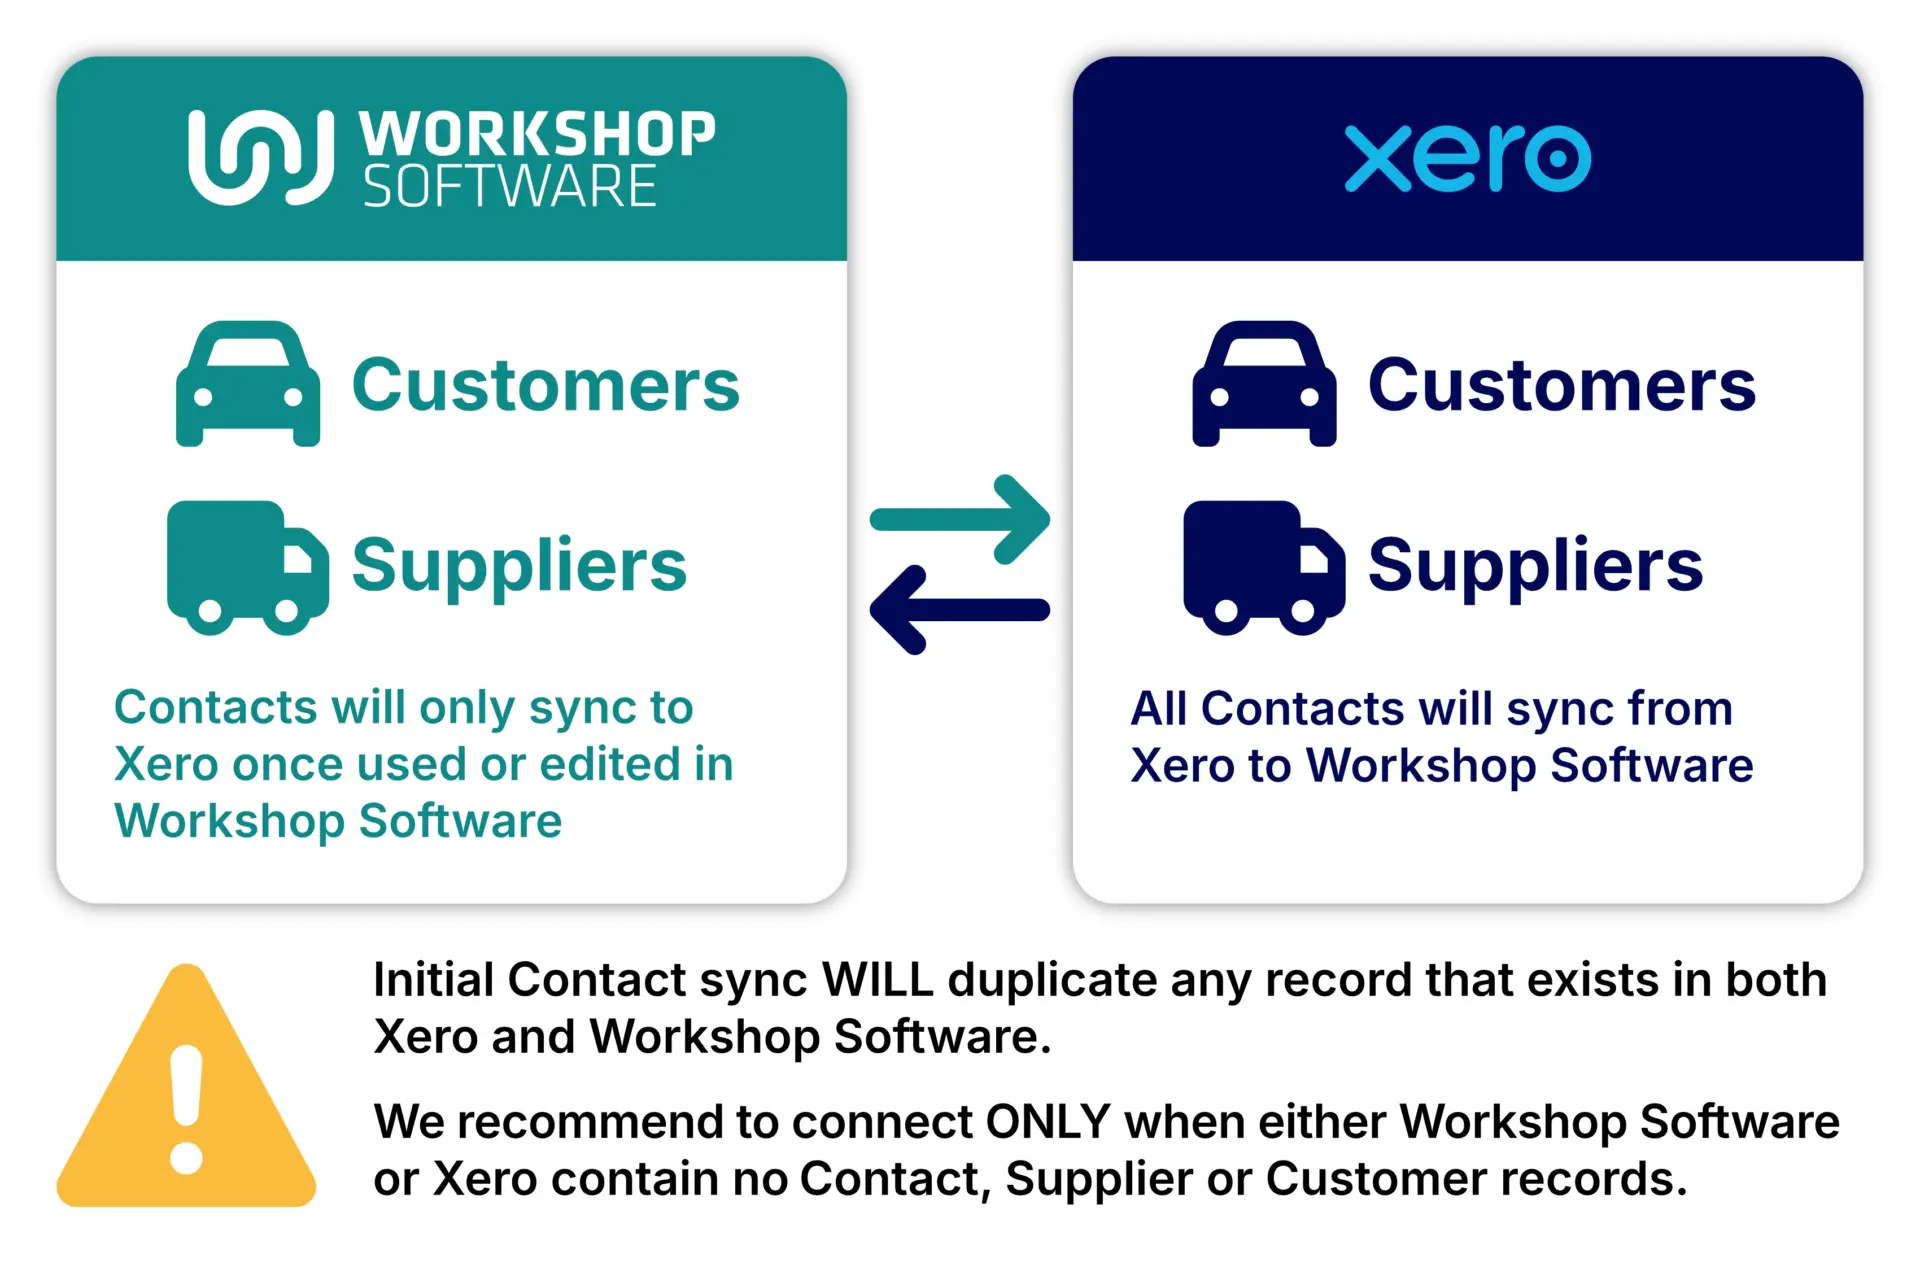
Please Note: If you create a new Contact, Customer or Supplier in Xero it will also be imported to Workshop Software during your next manual sync.
Transaction Sync
Processed Invoice and Payment records will periodically sync from Workshop Software to Xero when integrated, most transactions will sync over within a few seconds.
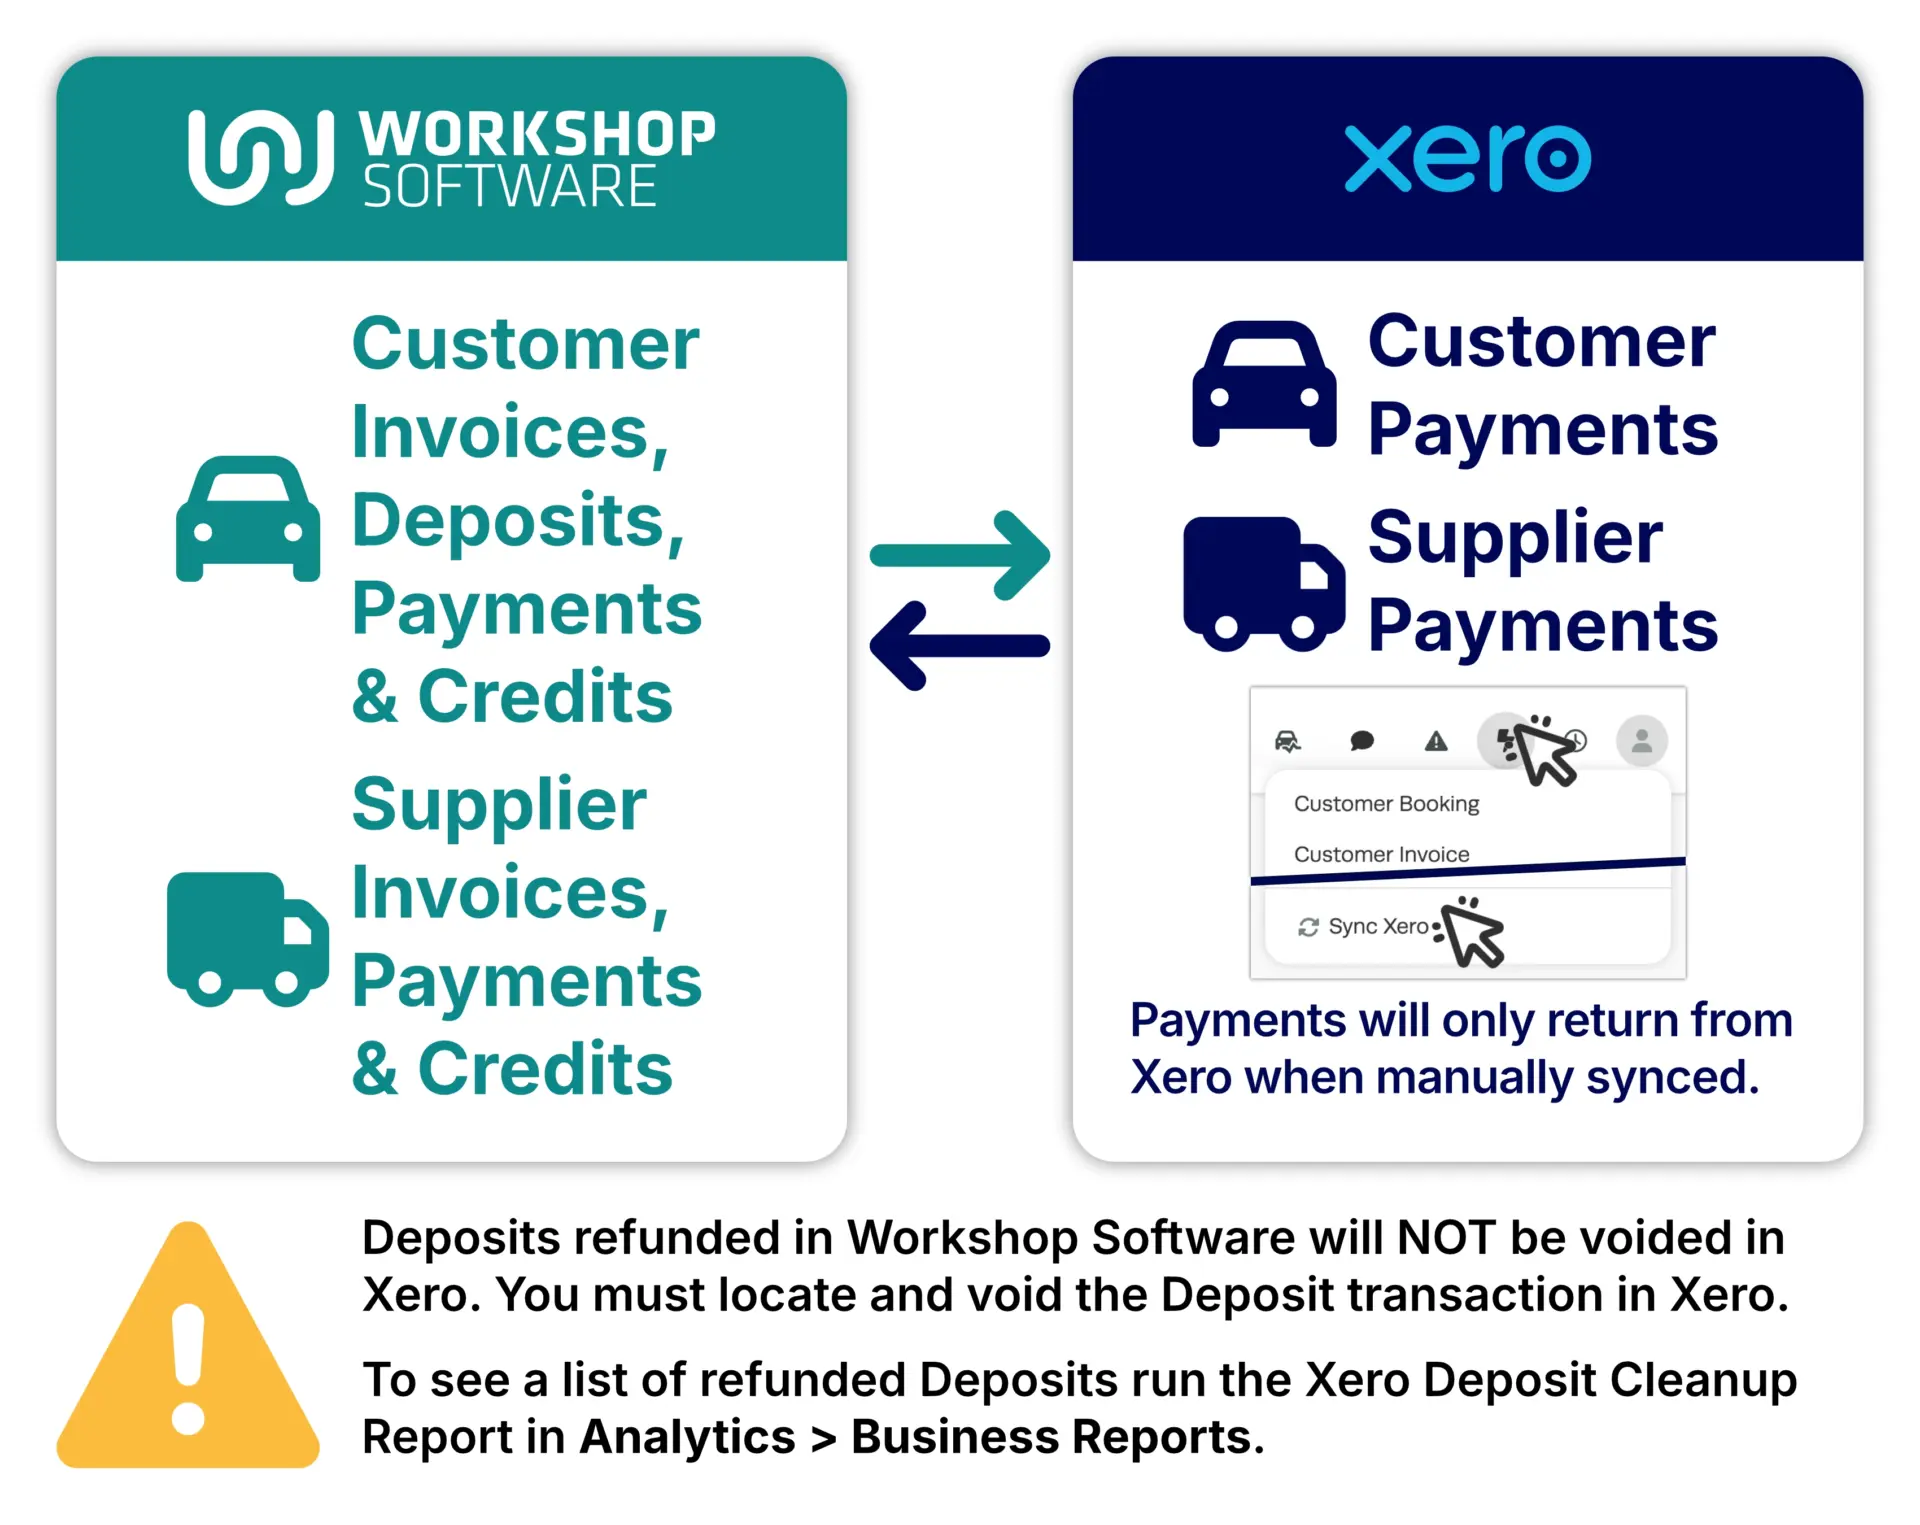
Invoices will only flow from Workshop Software to Xero. This includes Customer Invoices, Supplier Invoices, and Customer or Supplier Credits.
Deposits on a Customer Invoice in Workshop Software will sync when applied, as a Xero prepayment. When the Invoice is processed the prepayment will then be allocated to the final invoice and marked as paid.
Warning: Refunded Deposits will not be voided in Xero, Xero's API prevents any external system from Voiding prepayments. You must locate and Void the Deposit transaction in Xero after you delete it in Workshop Software. To see a list of refunded Deposits run the Xero Deposit Cleanup Report in Analytics > Business Reports.
Supplier Payments and Customer Payments including WorkshopPay transactions will sync to Xero when processed.
Customer and Supplier Payments recorded in Xero will only sync back to Workshop Software when a manual sync is performed in the Lightning Bolt menu. Payments should only be recorded in one software system.
If you Void a Customer Invoice, Supplier Invoice, Customer Payment or Supplier Payment in Workshop Software the corresponding record will be removed from Xero.
Please Note: Nothing voided in Xero syncs back to void a Workshop Software transaction.
Parts Sync
Parts do not integrate from Xero into Workshop Software and they are not tracked via Xero, only Workshop Software. If required you may import a parts list exported from Xero into Workshop Software.
Please contact support@workshopsoftware.com if you require importing services.
Account Mapping Explained
A Chart of Accounts is used in Accounting systems to categorise your financial transactions and provide your bookkeeper or accountant accurate financial reporting.
Each Account in Xero will have a unique type, name and code. Of the account types used in Xero the most relevant to Workshop Software are Revenue Accounts which record income, Expense Accounts which record costs, Liabilities which record money owed or held for other parties and connected Bank Accounts.
Please Note: By default Bank Accounts do not have a number Code assigned in Xero, Workshop Software's integration requires that you assign an account code to your Bank Accounts before integrating.
When Xero is integrated the user must map their Sale, Purchase and Deposit transactions to an appropriate Account in Xero and map which Bank Accounts are used to receive funds and send money when paying for purchases or issuing refunds.
Xero Account Codes
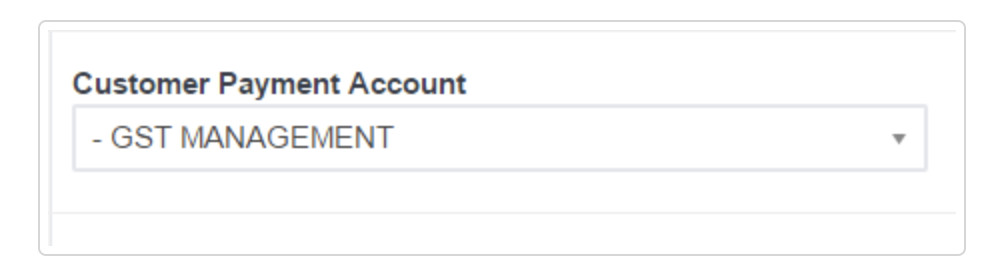
Important: All accounts in Xero must have account codes assigned. If an account is missing a code it will appear as show below in Workshop Software's Xero Integration page, note that there is only a "-" before the bank account.
Accounts that do not have a code visible to the left of this "-" will prevent the Xero Sync from completing successfully.
To fix a missing account code in Xero:
- Log into Xero.
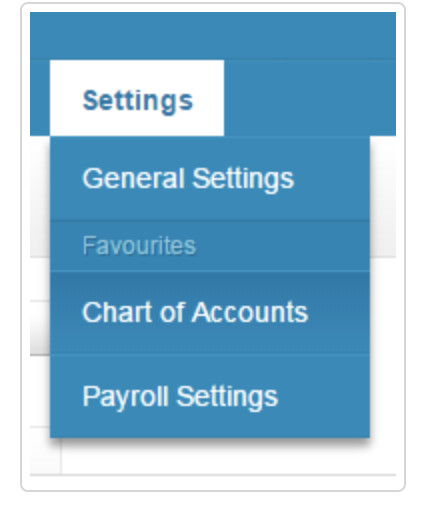
- Go to Settings then Chart of Accounts.
- Click on the account that is missing a code.
- Update the Code field and click Save.
How to Integrate Xero
Step 1: Open the Integrations Settings
Warning: Make sure your Customers and Suppliers are entered or imported into only one system before completing the integration.
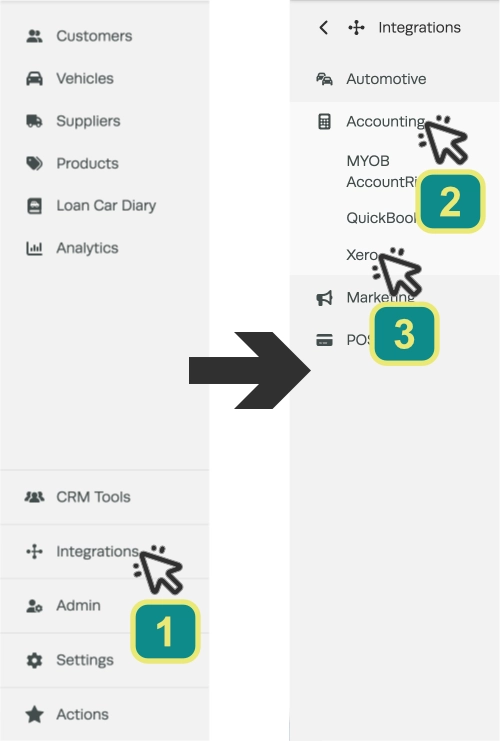
- In Workshop Software, click on Integrations (1) from the left-hand navigation menu then click Accounting (2).
- Click on the Xero (3) option to begin the setup.
Step 2: Authorise the Connection
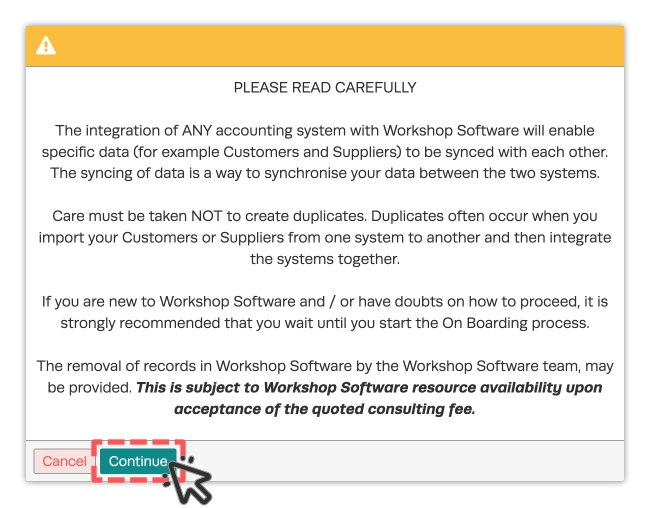
- Click the green Authorise button on the right-hand side of the page.

- You will see a notification, please read this carefully and reach out to Customer Support if you have ANY questions about Duplication or Syncing BEFORE choosing Continue.
- Workshop Software will now attempt to connect with Xero.
Step 3: Log In to Xero
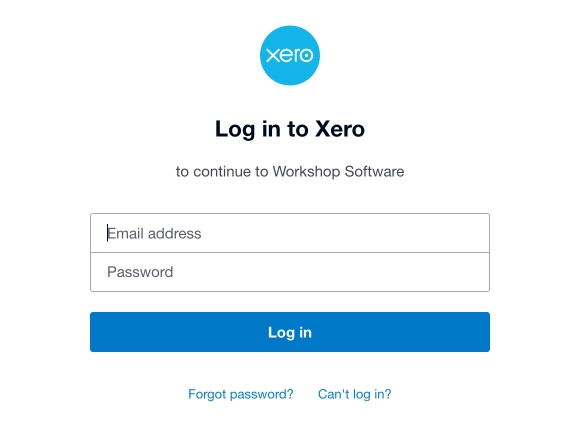
- Enter your Xero login details when prompted.
Step 4: Grant Access
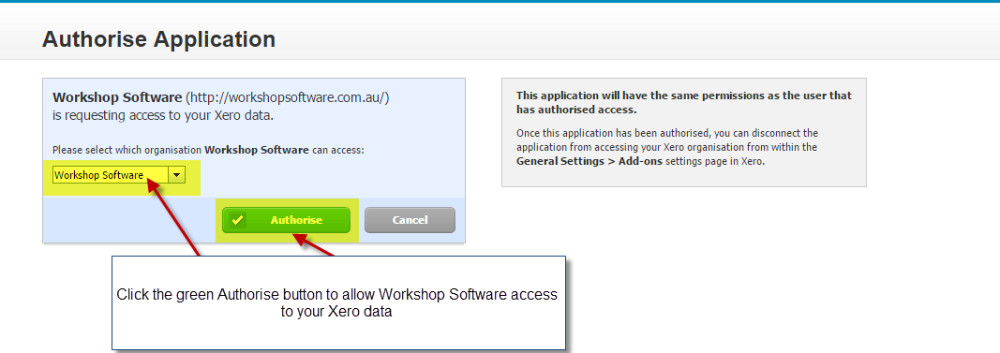
- Click the green Authorise button to confirm that Workshop Software can access your Xero data.
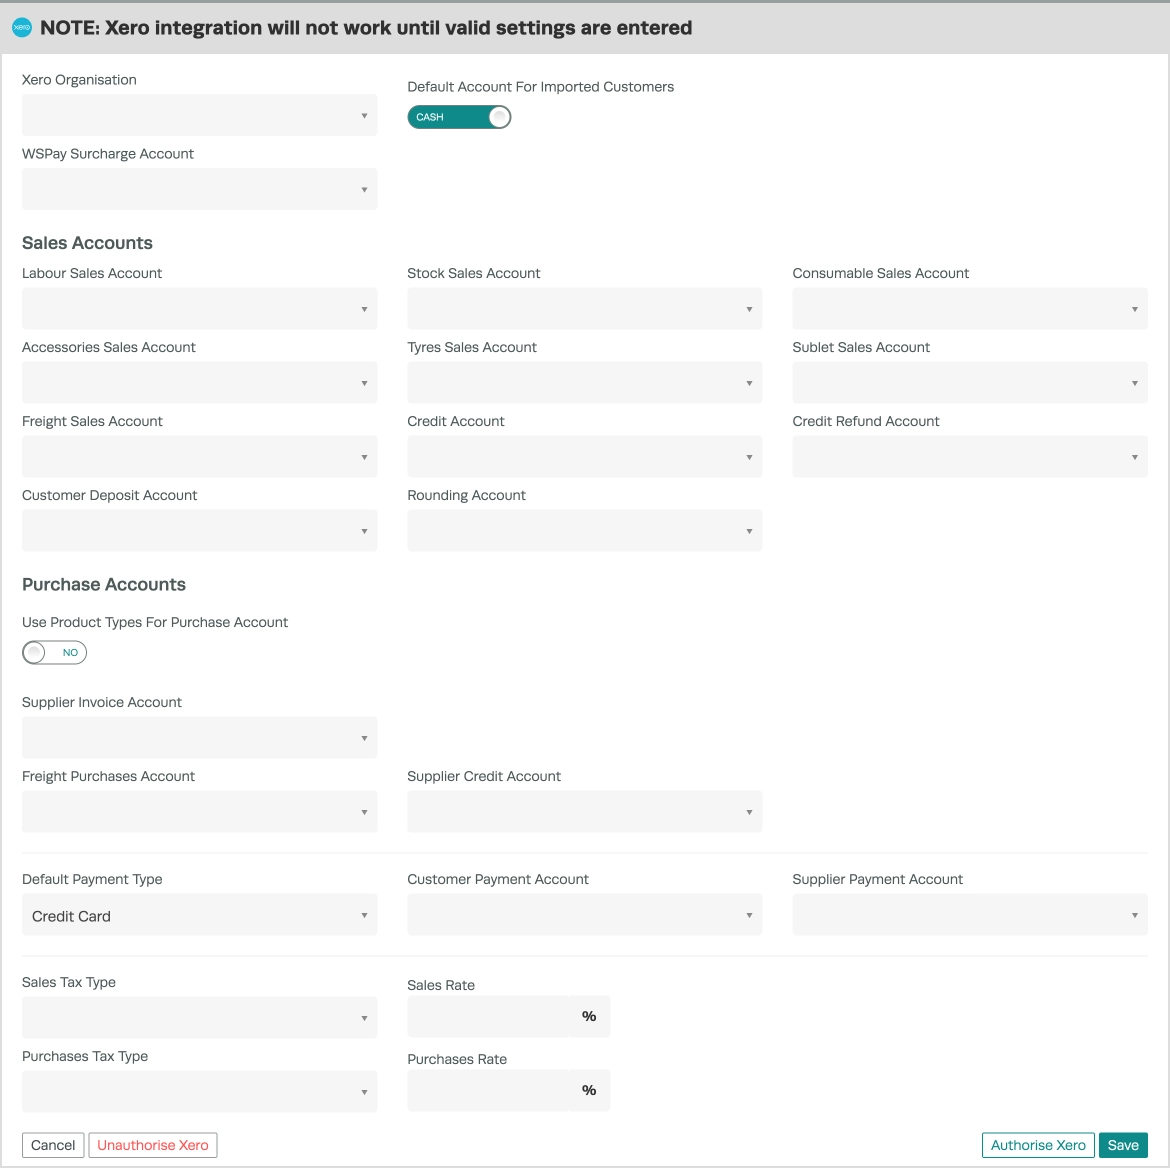
Step 5: Map Your Accounts
- Match the accounts in Workshop Software with the appropriate general ledger accounts from your Xero chart of accounts.
Warning: You must choose an Account in every field, otherwise the Xero Integration cannot connect properly.
- See the Account Mapping Reference section below for details on each account.
Step 6: Start Syncing
- You are now ready to sync, please ensure you have clicked the Save button in the bottom right of the Xero Integration page before continuing.
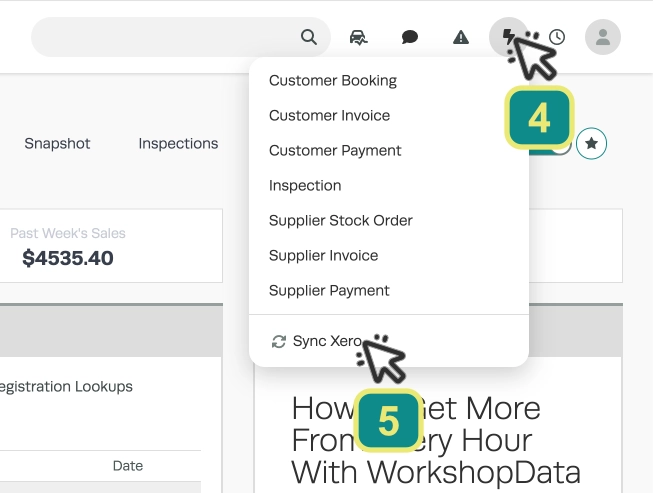
- Click the Lightning Bolt icon (4) at the top right of the page then click Sync Xero (5) to trigger your first Manual Sync.
Please Note: At the time of any Manual Sync any new Contacts in Xero not defined as a Customer or Supplier must be allocated within Workshop Software.
This Allocation must be completed in one go, viewing and updating each page and clicking Finish on the last page.
If you exit the allocation tool before finishing Workshop Software will request an Allocation after every Manual Sync until it is completed.
Once the initial sync is complete invoicing and payment information will flow from Workshop Software to Xero automatically.
As you are now integrated, Customer Invoices and Supplier Invoices should be entered into Workshop Software.
Account Mapping Reference
During the initial integration, you will be asked to map Workshop Software transactions to your Xero chart of accounts. Below is what each account means and which Xero account type may be connected.
Organisation and Surcharge Account
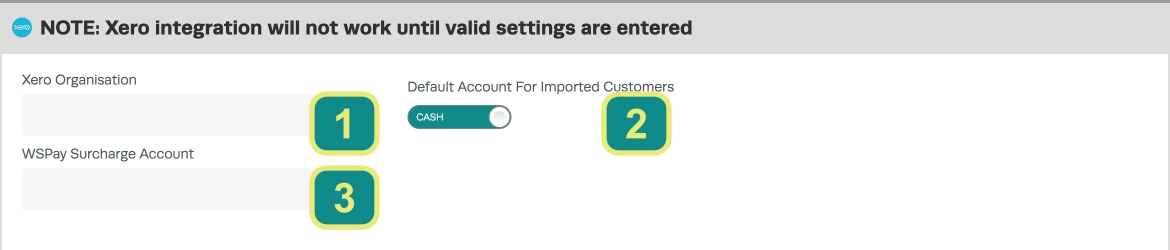
In addition to mapping Accounts from Xero's chart of accounts this page is used to select the Xero Organisation, if imported customers are expected to pay Cash on Delivery or with Credit Terms and the Bank Account that Workshop Pay surcharges will be received with.
| Field | What it does |
|---|---|
| 1. Xero Organisation | This setting confirms which Xero Organisation within the connected Xero account will sync with Workshop Software. This setting is critical if you are connecting to a Xero Account used for bookkeeping across multiple businesses or if your Accountant created your organisation in their Xero. |
| 2. Default Account for Imported Customers | In Workshop Software Customers defined as Cash Accounts are expected to Pay at the time an Invoice is processed, Account Customers pay with Credit terms e.g. 30 days End of Month. This Toggle determines which Account type Customers imported from Xero will be configured as by default. |
| 3. WSPay Surcharge Account | If you are able to and have configured WorkshopPay to automatically calculate and collect Surcharges when processing Customer Payments this field should be set to connect to the Account which receives the Surcharge Payments. |
Sales Accounts
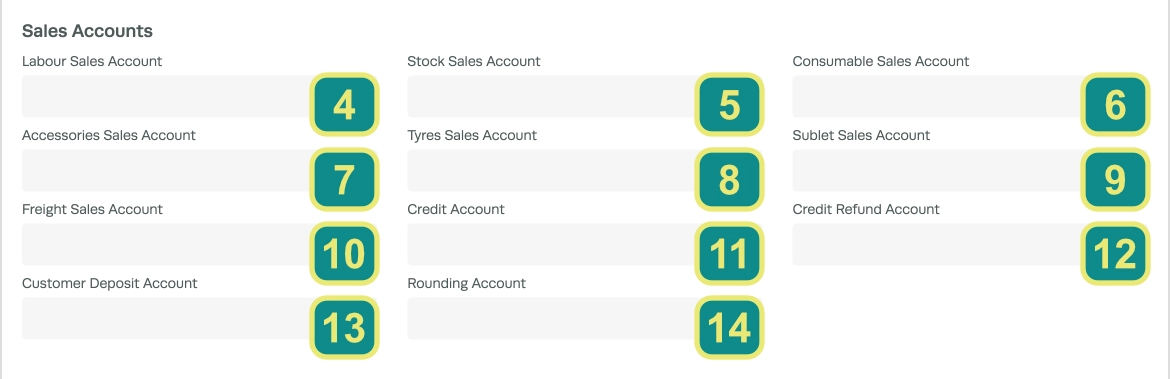
Sales Accounts record the incoming revenue for your business. The fields in this section also control where deposits are recorded, small rounding transactions are created and the Bank Account from which Customers receive any refunds.
Each of the Sale types match with Workshop Software's Product Type field, recording a sale of these products linked to the chosen account.
| Field | What it does |
|---|---|
| 4. Labour Sales Account | Must be a Sales or Revenue account. |
| 5. Stock Sales Account | Must be a Sales or Revenue account. |
| 6. Consumable Sales Account | Must be a Sales or Revenue account. |
| 7. Accessories Sales Account | Must be a Sales or Revenue account. |
| 8. Tyre Sales Account | Must be a Sales or Revenue account. |
| 9. Sublet Sales Account | Must be a Sales or Revenue account. |
| 10. Freight Sales Account | Must be a Sales or Revenue account. |
| 11. Credit Account | Must be a Sales or Revenue account. |
| 12. Credit Refund Account | Must be an Equity, Current Liability, or Bank account. |
| 13. Customer Deposit Account | Must be a Current Liability account with "Enable payment to this account" turned on in Xero. |
| 14. Rounding Account | Must be a Sales or Revenue account. |
Why does Customer Deposits need to be a Current Liability?
Customer deposits represent money you've received for work that hasn't yet been completed or invoiced. Until the sale is finalised those funds are considered money you owe to the customer so they should be recorded as a Current Liability rather than Income.
Purchase Accounts
In the Purchase Accounts list you may select the Expense Accounts which record your purchase transactions, select the Bank Accounts which receive Customer Payments or are used to send Supplier Payments, the default payment transaction type and your business tax settings.
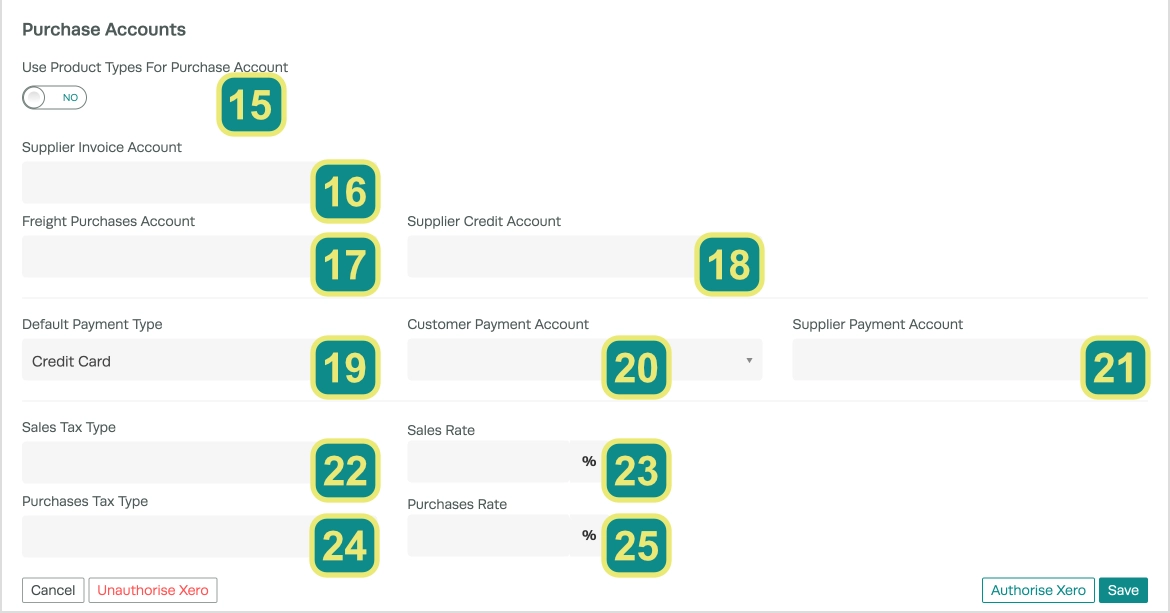
| Field | What it does |
|---|---|
| 15. Use Product Types For Purchase Account | When toggled on a new field for each Product Type will appear replacing the Supplier Invoice Account. |
| 16. Supplier Invoice Account | Must be an Expense account. |
| 17. Freight Purchases Account | Must be an Expense account. |
| 18. Supplier Credit Account | Must be an Expense account. |
| 19. Default Payment Type | Can be Cash, Credit Card, or Direct Deposit. |
| 20. Customer Payment Account | Must be an Equity, Current Liability, or Bank account. |
| 21. Supplier Payment Account | Must be an Equity, Current Liability, or Bank account. |
| 22. Sales Tax Type | Usually GST on Income. |
| 23. Sales Rate | This value will be preset depending upon the Country chosen in your Company Profile. This should be the same as your local Tax rate if you are collecting Tax. |
| 24. Purchases Tax Type | Usually GST on Expenses. |
| 25. Purchases Rate | This value will be preset depending upon the Country chosen in your Company Profile. This should be the same as your local Tax rate if you are collecting Tax. |
Good to Know
- If you experience any issues with the integration, contact the Workshop Software support team for assistance.