For a powerfully efficient and profitable workshop
Workshop Software frees up your time and transforms your business into a streamlined profit machine by managing and optimising your entire workflow. Take back control of your workshop with ease.
Save Time. Retain More Customers.


Serviced
Serviced
Serviced
Serviced
Generated
Generated
Generated
Generated
Processed
Processed
Processed
Processed

Auto shops change for the better
when they work with Workshop Software.
“Has made access to information much much easier”
Border BM

“So glad we made the leap and started using this software! We know we don’t use it to its full capacity being a small business but it has been a godsend for our sanity! Thanks James and team!”
Blackford’s Mechanical & Auto Electrical
“The system is easy to use. It took me no time at all to train my staff. This make the transfer over to Workshop Software so easy. They guys in support were always there if I needed a hand.”
Speedy Automotive
“A wonderful and integrated program.”
Nano Alsharq Workshop, Saudi Arabia
Workshop software has done wonders for our business.
The ability to access invoices through Myob has saved us heaps of time. The combined invoice and job feature is great and creates a professional look for our business. Any issues we have had been solved quick and easily.
The inspection tool has provided amazing customer retention and many clients are really happy and feel that they are being provided a very professional service.The email feature through auto inspect makes workshop software stand out as a cost effective and easy system to use.
Automotive Services
“We are going really well, still learning as we go. I make great use of the knowledge base, the fact that you can search questions is really helpful and the pictures and guides make it so that I can easily find answers.”
Mobile Services

Inefficiency limiting your profit and growth?
In the service business, time is your number 1 commodity. It's what you sell - and what makes or loses you money. Every minute of inefficiency due to lost paperwork, chasing customers, workflow bottlenecks and juggling finances costs your bottom line.
This daily chaos leads to mistakes, missed reminders, and delayed services. Not to mention unhappy customers who quickly turn to Google to find your local competitor. When you're overwhelmed by the day-to-day, 'stuck on the tools' and time poor, your profit and growth are shackled.
Optimise Performance, Maximise Profits
Workshop Software gives you total control of your time by streamlining and optimising your entire workflow. It's one clever, easy-to-use tool that delivers a complete, real-time picture of your workshop to improve performance, productivity and profits.
For over 30 years, Workshop Software has helped thousands of global workshops become more efficient. With instant onboarding, quick-start training and no costly setup fees, it's the perfect solution for modern automotive and mechanical workshops of all types.
With Workshop Software, you can finally create the 'hands off' workshop you've always imagined.

Boost Customer Retention & Generate Repeat Business on Autopilot
Discover how Workshop Software keeps your customers coming back through your doors again and again…

“Integration with Repco Navigator is the best thing, I think without that integration I would still be struggling to get the crew onto first base with it. It is this feature that has made the learning process worthwhile so far.”
AG and PA Briggs
“I love the booking diary! Its an amazing feature that gives you the ability to know what’s coming in and out at what time and what jobs are coming up.”
Viper Installations
Workshop software has done wonders for our business.
The ability to access invoices through Myob has saved us heaps of time. The combined invoice and job feature is great and creates a professional look for our business. Any issues we have had been solved quick and easily.
The inspection tool has provided amazing customer retention and many clients are really happy and feel that they are being provided a very professional service.The email feature through auto inspect makes workshop software stand out as a cost effective and easy system to use.
Automotive Services
“Workshop Software is simple to use, requires little setup and training. Its features and functionality are exactly what we need to run our workshop. We know mechanic productivity and profit on each job instantly.”
SBO Auto
“Easy web based system, makes invoicing more streamlined.”
Azzi & Nusser Service Centre
“The SMS function is fantastic. Our customer’s recognise the professionalism in getting a text reminder. This paired with the Auto Inspection tool really sets us apart from other workshops in our customer’s eyes. The after sales experience is great. We cannot fault the system.”
Stevenson’s Automotive Services
Integrates with your entire toolkit
Workshop Software seamlessly syncs with all the critical systems and tools that power your business. Accounting, marketing, CRM, purchasing, Digital Vehicle Inspection, and more are all connected in one place and safely secured in the cloud.
No starting from scratch, lost data, or disruption to the business.
Don’t see your system or need customization? Get in touch!
We don’t believe in a cookie-cutter approach for your workshop, and we always add new integrations.


Don't see your system or need customisation? Get in touch!
We don't believe in a cookie cutter approach for your
workshop and we add new integrations all the time…
Transform Your Workshop
into a Profit Machine
Completely optimise your workshop and free up your time with an overflowing
suite of versatile features that handle every aspect of your busy,
hectic daily operations.

Streamlined Workflow
Manage your entire workflow in one place from start to finish via an easy-to-use dashboard. Track job progress, stock tracking, quotes, staff allocation, invoicing, and more.
"I needed workshop specific invoicing software, I chose this software as it was the best one I found that could do what I needed. I'm better at organising my work and it looks very professional, I do recommend this software as it's easy to use."
Zane Kieser,
Byron Shire Auto Repairs

'One-Click'
Customer Management
Take the stress and time out of managing customers with automated text messages, emails and reminders. Deliver customer service like the 'big shops' - without the cost or overstaffing.
"So glad we made the leap and started using this software! We know we don't use it to its full capacity being a small business but it has been a godsend for our sanity! Thanks James and team!"
Deana Blackwood,
Blackford's Mechanical &
Auto Electrical

Dead Simple Invoicing
Get paid in full and on time, manage cashflow and keep pinpoint accurate books with simple invoicing that integrates directly with your accounting systems.
"The software has simplified the paperwork side of our workshop. Everything in one package, stock to invoice."
Tommy Glover,
Advance Service Centre

Automated Service
Reminders
Increase your leads, conversions and income with automated service reminders that bring customers back through your doors. It's like having a full-time marketing assistant working around-the-clock.
"The System is Awesome. I have been using it for a bit over 12 months now. The sms reminders are fantastic. My customers love get a reminder to service their car and I love my customer returning."
Adrian,
Ted The Tooner

Efficient Customer
Inspections
Auto-compiled, paperless inspections make job management simple and efficient from first quote to completion. Deliver details and costs to your customers' smartphones. Then get the go-ahead with one click.
"Really happy with Workshop Software simple and easy to use, also it's web base so I can access it anywhere to do an invoice as I am mobile Mechanic."
Michael Triscari
Perth Mobile Mechanics

Technician Productivity
Tracking
Track technician hours to maximise their productivity (and your profit!) with simple time clocking, job progress tracking and real-time photo management using our innovative mobile app.
"Workshop software is a fantastic application for small to medium workshop environments.Great application which has even bigger and better things to come."
Ben Broeder,
Goldfields Off Road
Plus So Much More...
“Workshop software is a great, easy to use program.I had tried multiple other software’s which were expensive and not as good, and finally came across workshop software when a friend who runs a workshop recommended it to me.
Workshop software is dedicated to the automotive industry with integrations such Repco navigator and Capricorn which have easy access to parts through just a click.
Overall is a great program.”
Downs mobile repairs
“Great software for my auto shop. Love the ease of use and the layout. Looks professional. Better than most other shop.”
Just Auto Service Centre
“We are 100% happy with Workshop Software. The constant feature updates show that they are always progressing and looking to the future. It also just re-enforces the fact that we chose the right software for our workshop”
Pulse Automotive
“Easy operating system that does the job professionally.”
Complete Auto Care
“I am really happy with workshop software, this software is so much better than our previous software. We have had no problem or issues with it what so ever, most of all I love the vehicle reports. Workshop Software has certainly helped our business and the way it is operating”
Lamacchina/
Cramp Bros Bodyworks
“So glad we made the leap and started using this software! We know we don’t use it to its full capacity being a small business but it has been a godsend for our sanity! Thanks James and team!”
Blackford’s Mechanical & Auto Electrical

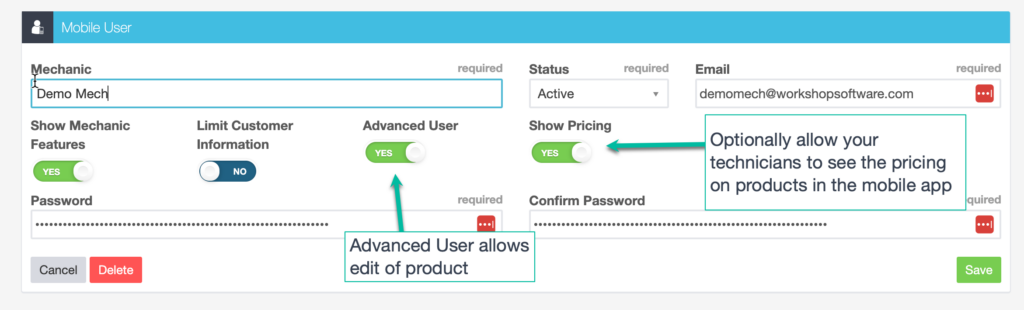
Your workshop, in the palm of your hand
Conveniently manage your entire workshop from your smartphone or tablet and take advantage of our innovative Workshop Software app. Take bookings, create job cards and manage customers, suppliers and products at your fingertips on your tablet or iPad. Plus, enjoy simple technician time clocking and photo management for stress-free productivity on our Workshop Software phone app.
Download the Workshop Software App now:


Discover What Makes the Top Workshops Tick with Our Latest Blog Posts

Unlocking Efficiency: Last Quarter Feature Updates
Unlocking Efficiency: Recap of Last Quarter’s Feature Updates for Workshop Software In…

January 2024 Release Announcement
Release Announcement There is an update coming in the week of 22…
Mobile App 2.0 Official Release
Mobile App 2.0 Official Release The new Workshop Software Mobile App is…